|
This document is under active development and discussion!
If you find errors or omissions in this document, please don’t hesitate to
submit an issue or
open a pull request with
a fix. We also encourage you to ask questions and discuss any aspects of the project on the
mailing lists or IRC.
New contributors are always welcome!
|
Preface
This reference guide covers Apache Syncope services for identity management, provisioning, and compliance.
1. Introduction
Often, Identity Management and Access Management are jointly referred, mainly because their two management worlds likely coexist in the same project or in the same environment.
The two topics are however completely different: each one has its own context, its own rules, its own best practices.
On the other hand, some products provide unorthodox implementations so it is indeed possible to do the same thing with both of them.
From the definitions above, Identity Management and Access Management can be seen as complementary: very often, the data synchronized by the former are then used by the latter to provide its features - e.g. authentication and authorization.
| Functionally, Apache Syncope implements Identity Management features. |
1.1. Identity Technologies
Identity and Access Management (IAM) is not implemented by a single technology; it is instead a composition of heterogeneous technologies - differing by maturity, scope, applicability and feature coverage - which require some 'glue' to fit together.
As with other application domains, it can be observed that tools that appeared earlier tend to partially overlap with more recent, targeted products.
1.1.1. Identity Stores
Identity Stores are the places where identity-related information is stored.
An Identity Store can be shared among several systems: as a result, there is a single place where account data is managed by administrators, and the same password can be used for the same user for accessing different applications.
Various Identity Store types are available:
-
Flat files (XML, CSV, …)
-
LDAP
-
Relational databases (MySQL, Oracle, Microsoft SQL Server, PostgreSQL, …)
-
Platform-specific (Microsoft Active Directory, FreeIPA, PowerShell, …)
-
Web services (REST, SOAP, …)
-
Cloud providers
-
…and much more.
|
Aren’t Identity Stores enough?
One might suppose that a single Identity Store can solve all the identity needs inside an organization, but there are a few drawbacks with this approach:
|
1.1.2. Provisioning Engines
The main role of Provisioning Engines is to keep Identity Stores synchronized as much as possible.
Some other characteristics and features provided:
-
Adapt to Identity Store data and application models
-
Do not require changes in Identity Stores or applications
-
Build virtual unified view of identity data distributed across several Identity Stores
-
Allow to define and enforce security policies
-
Permit workflow definition, with transitions subject to approval
-
Focused on application back-end
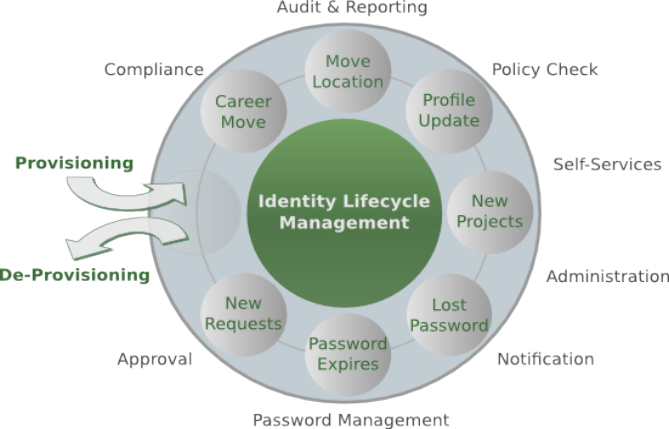
In brief, provisioning engines take heterogeneous Identity Stores (and business requirements) as input and build up high-level identity data management throughout what is called the Identity Lifecycle.
|
From a technology point of view, Apache Syncope is primarily a Provisioning Engine. |
1.1.3. Access Managers
Access Managers focus on the application front-end, enforcing application access via authentication (how Users are let access a given system) and authorization (which capabilities each user owns on a given system).
Several practices and standards can be implemented by Access Managers:
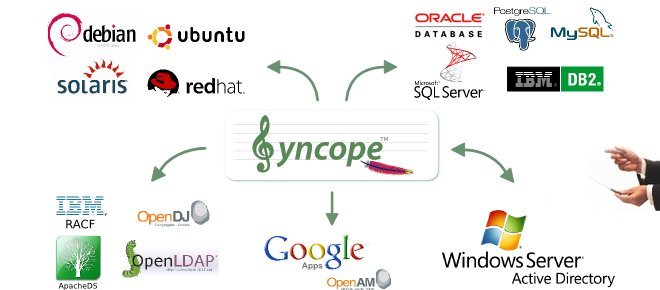
1.1.4. The Complete Picture
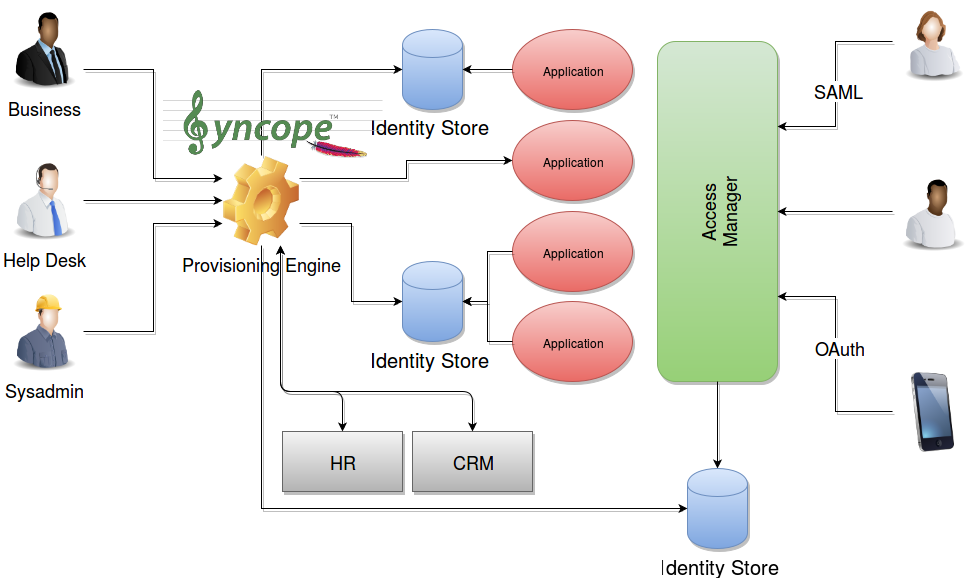
The picture below shows a typical scenario where an organization’s infrastructure is helped by identity technologies in providing secure and trusted application access to end-Users, while keeping different levels of data and processes under control for business owners, help-desk operators and system administrators.
2. Architecture
Apache Syncope is made of several components, which are logically summarized in the picture below.
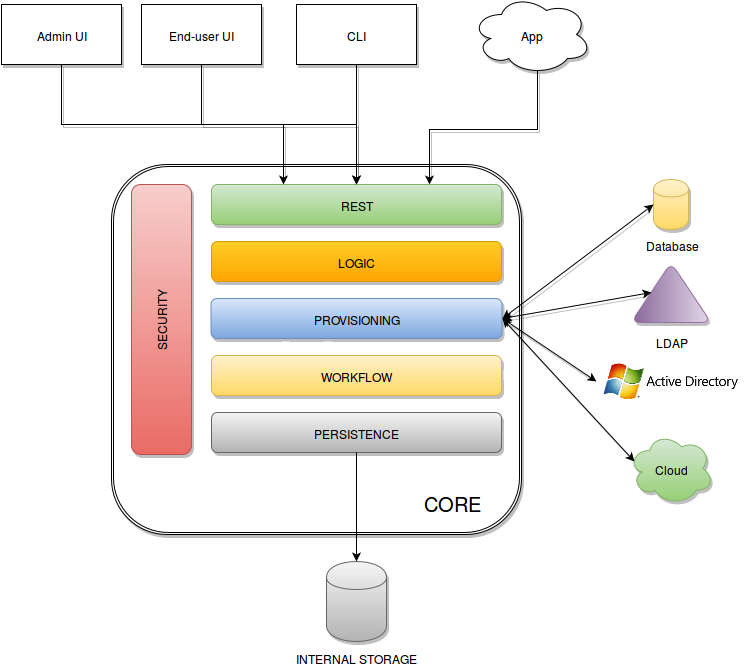
2.1. Core
All the services provided by Apache Syncope are defined, elaborated and served by the Core.
The Core is internally further structured into several layers, each one taking care of specific aspects of the identity management services.
2.1.1. REST
The primary way to consume Core services is the RESTful interface, which enables full access to all the features provided. This interface enables third-party applications, written in any programming language, to consume IdM services.
The rich pre-defined set of endpoints can be extended by adding new ones, which might be needed on a given Apache Syncope deployment to complement the native features with domain-specific operations.
An extension is also available, providing full Swagger features, which enables in-browser access to all the REST endpoints defined.
At a technical level, the RESTful interface is a fully-compliant JAX-RS 2.1 implementation based on Apache CXF, natively dealing either with JSON, YAML and XML payloads.
More details are available in the dedicated usage section.
2.1.2. Logic
Right below the external interface level, the overall business logic is responsible for orchestrating the other layers, by implementing the operations that can be triggered via REST services. It is also responsible for controlling some additional features (notifications, reports and auditing).
2.1.3. Provisioning
The Provisioning layer is involved with managing the internal (via workflow) and external (via specific connectors) representation of Users, Groups and Any Objects.
One of the most important features provided is the mapping definition: internal data (Users, for example)
representation is correlated with information available on the available Identity Stores.
Such definitions constitute the pillars of inbound (pull) and outbound (propagation / push)
provisioning.
The default implementation can be sometimes tailored to meet the requirements of a specific deployment, as it is the crucial decision point for defining and enforcing the consistency and transformations between internal and external data.
In addition, an Apache Camel-based implementation is also available as an extension, which brings all the power of runtime changes and adaptation.
2.1.4. Workflow
The Workflow layer is responsible for managing the internal lifecycle of Users, Groups and Any Objects.
Besides the default engine, another engine is available based on Flowable, the reference open source BPMN 2.0 implementation. It enables advanced features such as approval management and new statuses definitions; a web-based GUI editor, the Flowable Modeler, is also available.
2.1.5. Persistence
All data (users, groups, attributes, resources, …) is internally managed at a high level using a standard JPA 2.2 approach based on Apache OpenJPA. The data is persisted into an underlying database, referred to as Internal Storage. Consistency is ensured via the comprehensive transaction management provided by the Spring Framework.
Globally, this offers the ability to easily scale up to a million entities and at the same time allows great portability with no code changes: MySQL, MariaDB, PostgreSQL, Oracle and MS SQL Server are fully supported deployment options.
2.1.6. Security
Rather than being a separate layer, Security features are triggered throughout incoming request processing.
A fine-grained set of entitlements is defined which can be granted to administrators, thus enabling the implementation of delegated administration scenarios.
2.2. Admin UI
The Admin UI is the web-based console for configuring and administering running deployments, with full support for delegated administration.
The communication between Admin UI and Core is exclusively REST-based.
More details are available in the dedicated usage section.
2.2.1. Accessibility
The Admin Console UI is accessible to the visually impaired.
Two icons are present in the main login page and in the menu on the right:
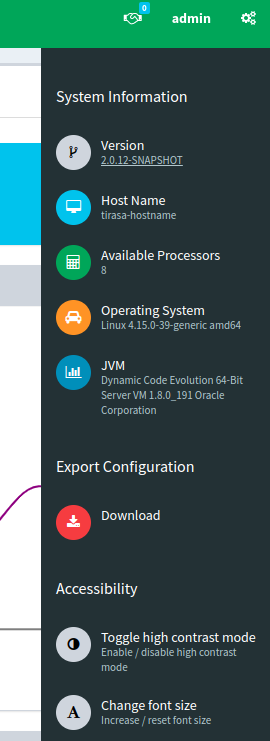
By clicking the top right corner icon ![]() it is possible to
toggle the "High contrast mode".
In this mode, the website colors are switched to a higher contrast color schema.
it is possible to
toggle the "High contrast mode".
In this mode, the website colors are switched to a higher contrast color schema.
|
The E.g.
|
By clicking the second icon ![]() it is possible
to toggle the "Increased font mode".
In this mode, the website font size is increased.
it is possible
to toggle the "Increased font mode".
In this mode, the website font size is increased.
|
The E.g.
|
To reset to the default mode, it is enough to click again on the specific icon.
2.3. End-user UI
The End-user UI is the web-based application for self-registration, self-service and password reset.
The communication between End-user UI and Core is exclusively REST-based.
2.3.1. Password Reset
When users lost their password, a feature is available to help gaining back access to Apache Syncope: password reset.
The process can be outlined as follows:
-
user asks for password reset, typically via end-user
-
user is asked to provide an answer to the security question that was selected during self-registration or self-update
-
if the expected answer is provided, a unique token with time-constrained validity is internally generated and an e-mail is sent to the configured address for the user with a link - again, typically to the end-user - containing such token value
-
user clicks on the received link and provides new password value, typically via end-user
-
user receives confirmation via e-mail
|
The outlined procedure requires a working e-mail configuration. In particular:
|
|
The process above requires the availability of security questions that users can pick up and provide answers for. The usage of security questions can be however disabled by setting the |
|
Once provided via Enduser Application, the answers to security questions are never reported, neither via REST or Admin UI to administrators, nor to end-users via Enduser Application. This to avoid any information disclosure which can potentially lead attackers to reset other users' passwords. |
| In addition to the password reset feature, administrators can set a flag on a given user so that he / she is forced to update their password value at next login. |
2.3.2. Accessibility
The End-user UI is accessible to the visually impaired.
Two icons are present in the main page, in the right corner:
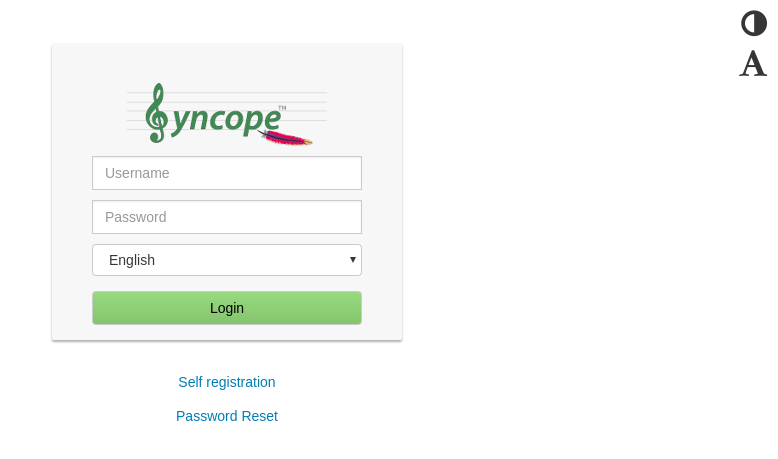
By clicking the top right corner icon ![]() it is possible to
toggle the "High contrast mode".
In this mode, the website colors are switched to a higher contrast color schema.
it is possible to
toggle the "High contrast mode".
In this mode, the website colors are switched to a higher contrast color schema.
|
The E.g.
|
By clicking the second icon ![]() it is possible
to toggle the "Increased font mode".
In this mode, the website font size is increased.
it is possible
to toggle the "Increased font mode".
In this mode, the website font size is increased.
|
The E.g.
|
To reset to the default mode, it is enough to click again on the specific icon.
2.4. CLI
The command-line interface (CLI) client is an utility tool meant for interacting with Apache Syncope deployments from shell scripts.
The communication between CLI and Core is exclusively REST-based.
More details are available in the dedicated usage section.
|
Deprecation
Syncope 2.1 is the last major version providing CLI. As an alternative you can consider using the popular curl tool to invoke the
Syncope Core REST API services. |
2.5. Third Party Applications
Third-party applications are provided full access to IdM services by leveraging the REST interface, either via the Java Client Library (the basis of Admin UI, End-user UI and CLI) or plain HTTP calls.
2.5.1. Eclipse IDE Plugin
The Eclipse IDE plugin allows remote management of notification e-mail and report templates, and constitutes an example of a Java application relying on the Client Library for interacting with the Core via REST.
2.5.2. Netbeans IDE Plugin
The Netbeans IDE plugin allows remote management of notification e-mail and
report templates, and remote editing of Apache Groovy implementations.
It constitutes an example of a Java application relying on the Client Library for interacting with the Core via REST.
3. Concepts
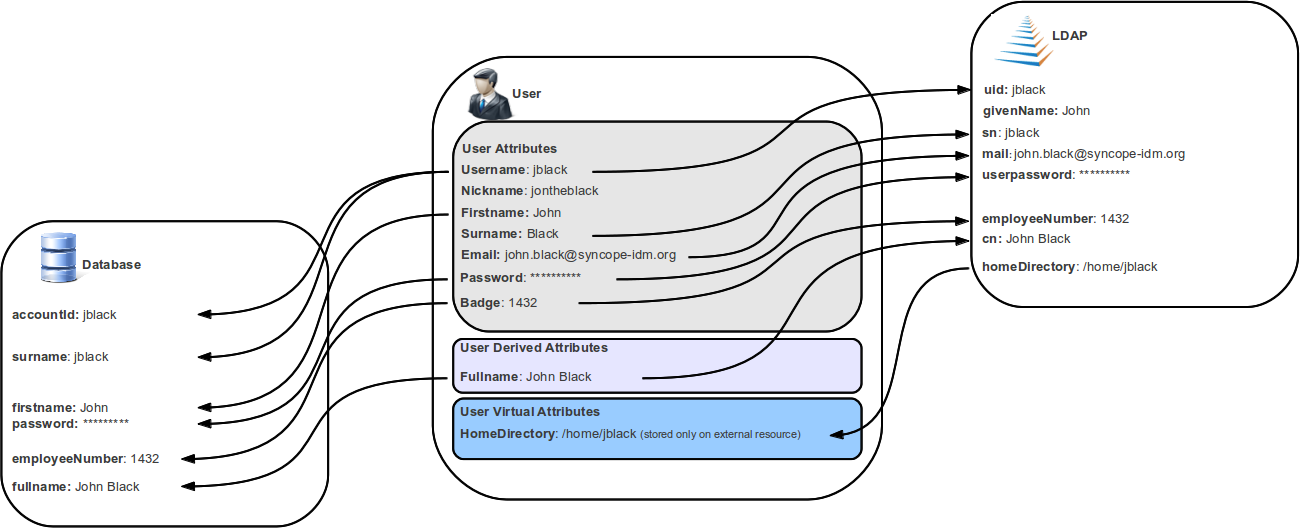
3.1. Users, Groups and Any Objects
Users, Groups and Any Objects are definitely the key entities to manage: as explained above in fact, the whole identity management concept is literally about managing identity data.
Starting with Apache Syncope 2.0, the following identities are supported:
-
Users represent the virtual identities build up of account information fragmented across the associated external resources
-
Groups have the dual purpose of representing entities on external resources supporting this concept (say LDAP or Active Directory) and putting together Users or Any Objects for implementing group-based provisioning, e.g. to dynamically associate Users or Any Objects to external resources
-
Any Objects actually cover very different entities that can be modeled: printers, services, sensors, …
For each of the identities above, Apache Syncope is capable of maintaining:
-
name(username, for Users) - string value uniquely identifying a specific user, group or any object instance; -
password(Users only) - hashed or encrypted value, depending on the selectedpassword.cipher.algorithm- see below for details - which can be used for authentication; -
set of attributes, with each attribute being a
(key,values)pair where-
keyis a string label (e.g.surname); -
valuesis a (possibly singleton) collection of data (e.g.[Doe]but also[john.doe@syncope.apache.org, jdoe@gmail.com]) ; the type of values that can be assigned to each attribute is defined via the schema matching thekeyvalue (e.g. plain, derived and virtual);
-
-
associations with external resources, for provisioning.
|
Which schemas can be populated for a given user / group / any object?
Each user / group / any object will be able to hold values for all schemas:
|
Moreover, Users and Any Objects can be part of Groups, or associated to other any objects.
|
Memberships and Relationships
When an user or an any object is assigned to a group, a membership is defined; the (static) members of a group benefit from type extensions. When an user or an any object is associated to another any object, a relationship is defined, of one of available relationship types. |
|
Static and Dynamic Memberships
Users and Any Objects are statically assigned to Groups when memberships are explicitly set. With group definition, however, a condition can be expressed so that all matching Users and Any Objects are
dynamic members of the group. |
3.2. Type Management
In order to manage which attributes can be owned by Users, Groups and any object, and which values can be provided, Apache Syncope defines a simple yet powerful type management system, vaguely inspired by the LDAP/X.500 information model.
| Starting with Apache Syncope 2.1, it is possible to define i18n labels for each schema, with purpose of improving presentation with Admin and End-user UIs. |
3.2.1. Schema
A schema instance describes the values that attributes with that schema will hold; it can be defined plain, derived or virtual.
Plain
Values for attributes with such schema types are provided during user, group or any object create / update.
When defining a plain schema, the following information must be provided:
-
Type
-
String -
Long- allows to specify a conversion pattern to / from string, according to DecimalFormat -
Double- allows to specify a conversion pattern to / from string, according to DecimalFormat -
Boolean -
Date- allows to specify a conversion pattern to / from string, according to DateFormat -
Enum-
enumeration values (mandatory)
-
enumeration labels (optional, values will be used alternatively)
-
-
Encrypted-
secret key (stored or referenced as Spring property)
-
cipher algorithm
-
whether transparent encryption is to be enabled, e.g. attribute values are stored as encrypted but available as cleartext on-demand (requires AES ciphering)
-
-
Binary- it is required to provide the declared mime type
-
-
Validator class - (optional) Java class validating the value(s) provided for attributes, see EmailAddressValidator for reference
-
Mandatory condition - JEXL expression indicating whether values for this schema must be necessarily provided or not; compared to simple boolean value, such condition allows to express complex statements like 'be mandatory only if this other attribute value is above 14', and so on
-
Unique constraint - make sure that no duplicate value(s) for this schema are found
-
Multivalue flag - whether single or multiple values are supported
-
Read-only flag - whether value(s) for this schema are modifiable only via internal code (say workflow tasks) or can be instead provided during ordinary provisioning
Derived
Sometimes it is useful to obtain values as arbitrary combinations of other attributes' values: for example, with
firstname and surname plain schemas, it is natural to think that fullname could be somehow defined as the
concatenation of firstname 's and surname 's values, separated by a blank space.
Derived schemas are always read-only and require a JEXL
expression to be specified that references plain schema types.
For the sample above, it would be
firstname + ' ' + surname
With derived attributes, values are not stored into the internal storage but calculated on request, by evaluating the related JEXL expression
Virtual
Virtual attributes are somehow linked from Identity Stores rather than stored internally.
The typical use case is when attribute values can change in the Identity Store without notice, and it is required to always have access to the most recent values that are available.
It can also be said that virtual schemas are for attributes whose ownership is not that of Syncope but of an Identity Store; the external resources for such Identity Stores are said to be the linking resources.
| As best practice, only attributes for which Apache Syncope retains ownership should be modeled as plain attributes; attributes for which Apache Syncope does not retain ownership should be modeled as virtual instead. |
When defining a virtual schema, the following information must be provided:
-
External resource - linking resource
-
External attribute - attribute to be linked on the external resource
-
Any Type - reference Any Type on the external resource
-
Read-only flag - whether the external attribute value(s) for this schema can only be read, or whether they can be written to as well
3.2.2. AnyTypeClass
Any type classes are aggregations of plain, derived and virtual schemas, provided with unique identifiers.
Classes can be assigned to Any Types and are also available as auxiliary (hence to be specified on a given user / group / any object instance) and for type extensions.
3.2.3. AnyType
Any types represent the type of identities that Apache Syncope is able to manage; besides the predefined USER and
GROUP, more types can be created to model workstations, printers, folders, sensors, services, …
For all Any Types that are defined, a set of classes can be selected so that instances of a given Any Type will be enabled to populate attributes for schemas in those classes.
Assuming that the following schemas are available:
-
plain:
firstname,surname,email -
derived:
fullname -
virtual:
enrollment
and that the following Any Type classes are defined:
-
minimal- containingfirstname,surnameandfullname -
member- containingemailandenrollment
and that the USER Any Type has only minimal assigned, then the following Users are valid (details are simplified to
increase readability):
{
  "key": "74cd8ece-715a-44a4-a736-e17b46c4e7e6",
  "type": "USER",
  "realm": "/",
  "username": "verdi",
  "plainAttrs": [
    {
      "schema": "surname",
      "values": [
        "Verdi"
      ]
    },
    {
      "schema": "firstname",
      "values": [
        "Giuseppe"
      ]
    }
  ],
  "derAttrs": [
    {
      "schema": "fullname",
      "values": [
        "Giuseppe Verdi"
      ]
    }
  ]
}

{
  "key": "1417acbe-cbf6-4277-9372-e75e04f97000",
  "type": "USER",
  "realm": "/",
  "username": "rossini",
  "auxClasses": [ "member" ],
  "plainAttrs": [
    {
      "schema": "surname",
      "values": [
        "Rossini"
      ]
    },
    {
      "schema": "firstname",
      "values": [
        "Gioacchino"
      ]
    },
    {
      "schema": "email",
      "values": [
        "gioacchino.rossini@syncope.apache.org"
      ]
    }
  ],
  "derAttrs": [
    {
      "schema": "fullname",
      "values": [
        "Gioacchino Rossini"
      ]
    }
  ],
  "virAttrs": [
    {
      "schema": "enrollment",
      "values": [
        "154322"
      ]
    }
  ]
}
3.2.4. RelationshipType
Relationships allow the creation of a link between a user and an any object, or between two Any Objects; relationship types define the available link types.
The following any object of type PRINTER contains a relationship of type neighbourhood with another PRINTER
(details are simplified to increase readability):
{
  "key": "fc6dbc3a-6c07-4965-8781-921e7401a4a5",
  "type": "PRINTER",
  "realm": "/",
  "name": "HP LJ 1300n",
  "auxClasses": [],
  "plainAttrs": [
    {
      "schema": "model",
      "values": [
        "Canon MFC8030"
      ]
    },
    {
      "schema": "location",
      "values": [
        "1st floor"
      ]
    }
  ],
  "relationships": [
    {
      "type": "neighbourhood",
      "rightType": "PRINTER",
      "rightKey": "8559d14d-58c2-46eb-a2d4-a7d35161e8f8"
    }
  ]
}
3.2.5. Type Extensions
When a user (or an any object) is part of a group, a membership is defined.
It is sometimes useful to define attributes which are bound to a particular membership: if, for example, the
University A and University B Groups are available, a student might have different e-mail addresses for each
university. How can this be modeled?
Type extensions define a set of classes associated to a group, that can be automatically assigned to a given user (or any object) when becoming a member of such group.
With reference to the sample above (details are simplified to increase readability):
{
  "key": "c9b2dec2-00a7-4855-97c0-d854842b4b24",
  "type": "USER",
  "realm": "/",
  "username": "bellini",
  "memberships": [
    {
      "type": "Membership",
      "rightType": "GROUP",
      "rightKey": "bf825fe1-7320-4a54-bd64-143b5c18ab97",
      "groupName": "University A",
      "plainAttrs": [
        {
          "schema": "email",
          "values": [
            "bellini@university_a.net"
          ]
        }
      ]
    },
    {
      "type": "Membership",
      "rightType": "GROUP",
      "rightKey": "bf825fe1-7320-4a54-bd64-143b5c18ab96",
      "groupName": "University B",
      "plainAttrs": [
        {
          "schema": "email",
          "values": [
            "bellini@university_b.net"
          ]
        }
      ]
    }
  ]
}
3.3. External Resources
3.3.1. Connector Bundles
Several Connector Bundles come included with Apache Syncope:
More Connector Bundles can be installed, if needed.
3.3.2. Connector Instance details
When defining a connector instance, the following information must be provided:
-
administration realm - the Realm under which administrators need to own entitlements in order to be allowed to manage this connector and all related external resources
-
connector bundle - one of the several already available, or some to be made from scratch, in order to fulfill specific requirements
-
pooling information
-
configuration - depending on the selected bundle, these are properties with configuration values: for example, with LDAP this means host, port, bind DN, object classes while with DBMS it would be JDBC URL, table name, etc.
-
capabilities - define what operations are allowed on this connector: during provisioning, if a certain operation is invoked but the corresponding capability is not set on the related connector instance, no actual action is performed on the underlying connector; the capabilities are:
-
AUTHENTICATE- consent to pass-through authentication -
CREATE- create objects on the underlying connector -
UPDATE- update objects on the underlying connector -
DELETE- delete objects on the underlying connector -
SEARCH- search / read objects from the underlying connector; used during pull withFULL RECONCILIATIONorFILTERED RECONCILIATIONmode -
SYNC- synchronize objects from the underlying connector; used during pull withINCREMENTALmode
-
|
Configuration and capability override
Capabilities and individual configuration properties can be set for override: in this case, all the external resources using the given connector instance will have the chance to override some configuration values, or the capabilities set. This can be useful when the same connector instance is shared among different resources, with little difference in the required configuration or capabilities. |
3.3.3. External Resource details
Given a selected connector instance, the following information is required to define an external resource:
-
priority - integer value, in use by the default propagation task executor
-
generate random password flag - under some circumstances, a password might be mandatory but no actual value could be available: with this flag set, a random value will be generated, compliant with the defined password policy (if set)
-
propagation actions - which actions shall be executed during propagation
-
trace levels - control how much tracing (including logs and execution details) shall be carried over during propagation, pull and push
-
configuration - see above
-
capabilities - see above
-
account policy - which account policy to enforce on Users, Groups and Any Objects assigned to this external resource
-
password policy - which password policy to enforce on Users, Groups and Any Objects assigned to this external resource
-
pull policy - which pull policy to apply during pull on this external resource
-
push policy - which push policy to apply during push on this external resource
3.3.4. Mapping
The mapping between internal and external data is of crucial importance when configuring an external resource. Such information, in fact, plays a key role for provisioning.
For each of the Any Types supported by the underlying connector, a different mapping is provided.
A mapping is essentially a collection of mapping items describing the correspondence between an user / group / any object attribute and its counterpart on the Identity Store represented by the current external resource. Each item specifies:
-
internal attribute - the schema acting as the source or destination of provisioning operations; it must be specified by an expression matching one of the following models:
-
schema- resolves to the attribute for the givenschema, owned by the mapped entity (user, group, any object) -
groups[groupName].schema- resolves to the attribute for the givenschema, owned by the group with namegroupName, if a membership for the mapped entity exists -
users[userName].schema- resolves to the attribute for the givenschema, owned by the user with nameuserName, if a relationship with the mapped entity exists -
anyObjects[anyObjectName].schema- resolves to the attribute for the givenschema, owned by the any object with nameanyObjectName, if a relationship with the mapped entity exists -
relationships[relationshipType][relationshipAnyType].schema- resolves to the attribute for the givenschema, owned by the any object of typerelationshipAnyType, if a relationship of typerelationshipTypewith the mapped entity exists -
memberships[groupName].schema- resolves to the attribute for the givenschema, owned by the membership for groupgroupNameof the mapped entity (user, any object), if such a membership exists -
privileges[applicationKey]- resolves to the list of privileges related to the given application, owned by the mapped entity (which can only be user, in this case)
-
-
external attribute - the name of the attribute on the Identity Store
-
transformers - JEXL expression or Java class implementing ItemTransformer ; the purpose is to transform values before they are sent to or received from the underlying connector
-
mandatory condition - JEXL expression indicating whether values for this mapping item must be necessarily available or not; compared to a simple boolean value, such condition allows complex statements to be expressed such as 'be mandatory only if this other attribute value is above 14', and so on
-
remote key flag - should this item be considered as the key value on the Identity Store, if no pull or push correlation rules are applicable?
-
password flag (Users only) - should this item be treated as the password value?
-
purpose - should this item be considered for propagation / push, pull, both or none?
Besides the items documented above, some more data needs to be specified for a complete mapping:
-
which object class shall be used during communication with the Identity Store; predefined are
__ACCOUNT__for Users and__GROUP__for Groups -
whether matches between user / group / any object’s attribute values and their counterparts on the Identity Store should be performed in a case-sensitive fashion or not
-
which schema shall be used to hold values for identifiers generated upon create by the Identity Store - required by some cloud providers not accepting provided values as unique references
-
the model for generating the DN (distinguished name) values - only required by some connector bundles as LDAP and Active Directory
The following mapping item binds the mandatory internal name schema with the external attribute cn for both
propagation / push and pull.
{
  "key": "a2bf43c8-74cb-4250-92cf-fb8889409ac1",
  "intAttrName": "name",
  "extAttrName": "cn",
  "connObjectKey": true,
  "password": false,
  "mandatoryCondition": "true",
  "purpose": "BOTH"
}
The following mapping item binds the optional internal aLong schema for the membership of the additional group
with the external attribute age for propagation / push only; in addition, it specifies a JEXL expression which appends .0
to the selected aLong value before sending it out to the underlying connector.
{
  "key": "9dde8bd5-f158-499e-9d81-3d7fcf9ea1e8",
  "intAttrName": "memberships[additional].aLong",
  "extAttrName": "age",
  "connObjectKey": false,
  "password": false,
  "mandatoryCondition": "false",
  "purpose": "PROPAGATION",
  "propagationJEXLTransformer": "value + '.0'"
}|
Object link and Realms hierarchy
When Object link is applicable - typically with LDAP or Active Directory, as said - the need may arise to map the Realms hierarchy into nested structures, as Organizational Units. In such cases, the following JEXL expressions can be set for Object link (assuming
|
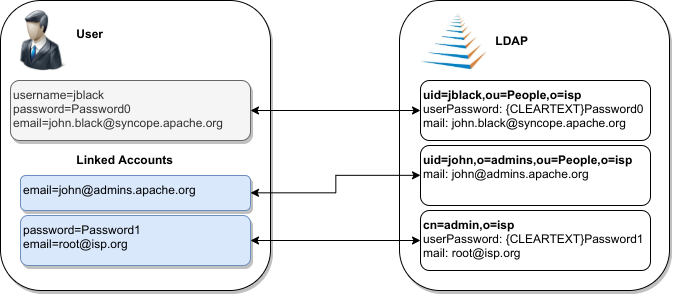
3.3.5. Linked Accounts
Sometimes the information provided by the mapping is not enough to define a one-to-one correspondence between Users / Groups / Any Objects and objects on External Resources.
There can be many reasons for this situation, including existence of so-called service accounts (typical with LDAP or Active Directory), or simply the uncomfortable reality that system integrators keep encountering when legacy systems are to be enrolled into a brand new IAM system.
Starting with Apache Syncope 2.1.6, Users can have, on a given External Resource with USER mapping defined:
-
zero or one mapped account
if the External Resource is assigned either directly or via Group membership. -
zero or more linked accounts
as internal representation of objects on the External Resource, defined in terms of username, password and / or plain attribute values override, with reference to the owning User.
Linked Accounts are propagated alongside with owning User - following the existing push correation rule if available - and pulled according to the given pull correation rule, if present.
3.4. Realms
Realms define a hierarchical security domain tree, primarily meant for containing Users, Groups and Any Objects.
Each realm:
-
has a unique name and a parent realm - except for the pre-defined root realm, which is named
/; -
is either a leaf or root of a sub-tree of realms;
-
is uniquely identified by the path from the root realm, e.g.
/a/b/cidentifies the sub-realmcin the sub-tree rooted atb, having in turnaas parent realm, directly under the root realm; -
optionally refers to account and password policies: such policies are enforced on all Users, Groups and Any Objects in the given realm and sub-realms, unless some sub-realms define their own policies.
If Users, Groups and Any Objects are members of a realm then they are also members of the parent realm: as a result, the root realm contains everything, and other realms can be seen as containers that split up the total number of entities into smaller pools.
This has consequences on memberships and relationships:
-
A User or an Any Object can be members of Groups in the same realm or in one of the parent realms.
-
A User or an Any object can be in a relation with Any Objects in the same realm or in one of parent realms.
Moreover, this partition allows fine-grained control over policy enforcement and, alongside with entitlements and roles, helps to implement delegated administration.
|
Logic Templates
As with pull it is also possible to add templates to a realm. The values specified in the template are applied to entities belonging to that realm, hence this can be used as a mechanism for setting default values for attributes or external resources on entities. Logic Templates apply to all operations passing through the logic layer, e.g. triggered by REST requests. |
3.4.1. Realm Provisioning
Provisioning can be enabled for realms: mapping information can be provided so that realms are considered during propagation, pull and push execution.
A typical use case for realm provisioning is to model an organization-like structure on Identity Stores, as with LDAP and Active Directory.
3.4.2. LogicActions
When Users, Groups or Any Objects get created, updated or deleted in a realm, custom logic can be invoked by associating the given Realm with one or more implementations of the LogicActions interface.
| LogicActions apply to all operations passing through the logic layer, e.g. triggered by REST requests. |
3.5. Entitlements
Entitlements are basically strings describing the right to perform an operation on Syncope.
The components in the logic layer are annotated with
Spring Security to implement declarative security; in the following
code snippet taken from
RealmLogic
, the
hasRole expression
is used together with one of the standard entitlements to restrict access only to Users owning the REALM_LIST
entitlement.
@PreAuthorize("hasRole('" + StandardEntitlement.REALM_LIST + "')")
public List<RealmTO> list(final String fullPath) {
Entitlements are granted via roles to Users, scoped under certain realms, thus allowing delegated administration.
|
The set of available entitlements is statically defined - even though extensions have the ability to enlarge the initial list : this is because entitlements are the pillars of the internal security model and are not meant for external usage. If you need to model the rights that Users own on external applications, look at privileges, instead. |
3.6. Privileges
Privileges model the rights that Users own on external applications.
Privileges are granted via roles to Users.
| The typical use case for privileges is to use Syncope as registry for available applications and privileges that users can own on those; once done this, external tools can query Syncope about the privileges owned by given users. |
3.7. Roles
Roles map a set of entitlements to a set of realms and / or dynamic realms.
In addition, Roles can be used to assign privileges to Users.
|
Static and Dynamic Memberships
Users are statically assigned to roles when assignments are explicitly set. However, a condition can be expressed in the role definition so that all matching Users are dynamic members of the role. |
3.7.1. Delegated Administration
The idea is that any user U assigned to a role R, which provides entitlements E1…En for realms Re1…Rem, can exercise Ei on entities (Users, Groups, Any Objects of given types - depending on Ei - or Connector Instances and External Resources) under any Rej or related sub-realms.
Moreover, any user U assigned to a role R, which provides entitlements E1…En for dynamic realms DR1..DRn, can exercise Ei on entities (Users, Groups, Any Objects of given types, depending on Ei) matching the conditions defined for any DRk.
|
Dynamic Realms limitations
Users to whom administration rights were granted via Dynamic Realms can only update Users, Groups and Any Objects,
not create nor delete. |
Let’s suppose that we want to implement the following scenario:
As by default, Apache Syncope will have defined the following entitlements, among others:
-
USER_CREATE -
USER_UPDATE -
GROUP_UPDATE
Hence, here is how entitlements should be assigned (via roles) to administrators in order to implement the scenario above:
-
Administrator A:
USER_CREATEon R5 -
Administrator B:
USER_UPDATEon R6 and R8 -
Administrator C:
GROUP_UPDATEon R8
|
Delegated Administration via Admin Console
When administering via REST, the entitlements to be granted to delegated administrators are straightforward:
When using the Admin Console, instead, more entitlements are generally required: this because the underlying
implementation takes care of simplifying the UX as much as possible.
|
Group Ownership
Groups can designate a User or another Group as owner.
The practical consequence of this setting is that Users owning a Group (either because they are directly set as owners or members of the owning Group) is that they are entitled to
-
perform all operations (create, update, delete, …) on the owned Group
-
perform all operations (create, update, delete, …) on all User and Any Object members of the owner Group, with exception of removing members from the Group itself
regardless of the Realm.
The actual Entitlements are assigned through the predefined GROUP_OWNER Role:
-
USER_SEARCH -
USER_READ -
USER_CREATE -
USER_UPDATE -
USER_DELETE -
ANYTYPECLASS_READ -
ANYTYPE_LIST -
ANYTYPECLASS_LIST -
RELATIONSHIPTYPE_LIST -
ANYTYPE_READ -
REALM_LIST -
GROUP_SEARCH -
GROUP_READ -
GROUP_UPDATE -
GROUP_DELETE
The GROUP_OWNER Role can be updated to adjust the set of assigned Entitlements.
3.7.2. Delegation
With Delegation, any user can delegate other users to perform operations on their behalf.
In order to set up a Delegation, the following information shall be provided:
-
delegating User (mandatory) - administrators granted with
DELEGATION_CREATEEntitlement can create Delegations for all defined Users; otherwise, the only accepted value is the User itself; -
delegated User (mandatory) - any User defined, distinct from delegating;
-
start (mandatory) - initial timestamp from which the Delegation is considered effective;
-
end (optional) - final timestamp after which the Delegation is not considered effective: when not provided, Delegation will remain valid unless deleted;
-
roles (optional) - set of Roles granted by delegating to delegated User: only Roles owned by delegating can be granted, when not provided all owned Roles are considered as part of the Delegation.
| Audit entries generated when operating under Delegation will report both delegating and delegated users. |
3.8. Provisioning
As described above, provisioning is actually the core feature provided by Apache Syncope.
Essentially, it can be seen as the process of keeping the identity data synchronized between Syncope and related external resources, according to the specifications provided by the mapping. It does this by performing create, update and delete operations onto the internal storage or external resources via connectors.
3.8.1. Overview
The picture below contains an expanded view of the core architecture, with particular reference to the components involved in the provisioning process.

The provisioning operations can be initiated in several different ways:
-
by creating, updating or deleting Users, Groups or Any Objects via REST (thus involving the underlying logic layer)
-
by requesting execution of pull or push tasks via REST
-
by triggering periodic pull or push task executions
|
Provisioning Managers
The provisioning operations are defined by the provisioning manager interfaces: Default implementations are available: An Apache Camel-based implementation is available as extension. |
3.8.2. Propagation
Whenever a change is performed via REST on Users, Groups or Any Objects:
-
a set of propagation tasks is generated, one for each associated external resource;
-
the generated propagation tasks are executed, e.g. the corresponding operations (create, update or delete) are sent out, via connectors, to the configured Identity Stores; the tasks can be saved for later re-execution.
|
Which external resources?
Depending on the entity being created / updated / deleted, different external resources are taken into account by the propagation process:
|
|
Adequate capabilities to Connectors and External Resources
Ensure to provide an adequate set of capabilities to underlying Connectors and
External Resources for the actual operations to perform, otherwise the Propagation Tasks will report |
|
Propagate password values
Password values are kept in the internal storage according to the During propagation, Syncope fetches all data of the given User, then prepares the attributes to propagate, according to the provided mapping; password has a special treatment:
Password values are always sent to External Resources wrapped as ConnId GuardedString objects. |
By default, the propagation process is controlled by the PriorityPropagationTaskExecutor, which implements the following logic:
-
sort the tasks according to the related resource’s priority, then execute sequentially
-
tasks for resources with no priority are executed afterwards, concurrently
-
the execution of a given set of tasks is halted (and global failure is reported) whenever the first sequential task fails
-
status and eventual error message (in case of no resource priority) can be saved for reporting, in the case where the related external resource was configured with adequate tracing
-
minimize the set of operations to be actually performed onto the Identity Store by attempting to read the external object corresponding to the internal entity and comparing with the modifications provided
|
Create or update?
The minimization performed by
|
Different implementations of the PropagationTaskExecutor interface can be provided, in case the required behavior does not fit into the provided implementation.
PropagationActions
The propagation process can be decorated with custom logic to be invoked around task execution, by associating external resources to one or more implementations of the PropagationActions interface.
Some examples are included by default, see table below.
If a User is associated with a Group in Syncope, keep the corresponding User as a member of the corresponding Group in LDAP or AD. |
|
If no password value was already provided in the propagation task, sends out the internal password hash value to LDAP;
the cipher algorithm associated with the password must match the value of |
|
If no password value was already provided in the propagation task, sends out the internal password hash value to DBMS;
the cipher algorithm associated with the password must match the value of |
|
Required for setup of an External Resource based on the ConnId GoogleApps connector bundle. |
3.8.3. Pull
Pull is the mechanism used to acquire identity data from Identity Stores; for each external resource, one or more pull tasks can be defined, run and scheduled for period execution.
Pull task execution involves querying the external resource and then processing each entity in an isolated transaction; a retrieved entity can be:
-
matching if a corresponding internal entity was found, according to the mapping of - or the pull policy set for, if present - the enclosing external resource;
-
unmatching otherwise.
Once this has been assessed, entities are processed according to the matching / unmatching rules specified for the pull task: by default, unmatching entities get created internally, and matching entities are updated.
|
Pull Mode
The Identity Store can be queried in different ways, depending on the pull mode that is specified: |
|
Pull Templates
As the values specified in the template are applied to pulled entities, this can be used as mechanism for setting default values for attributes or external resources on entities. A typical use case is, when pulling Users from the external resource |
PullActions
The pull process can be decorated with custom logic to be invoked around task execution, by associating pull tasks to one or more implementations of the PullActions interface.
Some examples are included by default, see the table below.
If a User is associated with a Group in AD, keep the corresponding User as a member of the corresponding Group in Syncope. |
|
If a User is associated with a Group in LDAP, keep the corresponding User as a member of the corresponding Group in Syncope. |
|
Import hashed password values from LDAP;
the cipher algorithm associated with the password must match the value of |
|
Import hashed password values from DBMS;
the cipher algorithm associated with the password must match the value of |
Remediation
Errors during pull might arise for various reasons: values might not be provided for all mandatory attributes or fail the configured validation, delete User as consequence of an incremental change’s processing might be blocked because such User is configured as Group owner, and so on.
When Remediation is enabled for a certain Pull Task, execution errors are reported to administrators, which are given the chance to examine and possibly fix, or just discard.
3.8.4. Push
With push, the matching set of internal entities can be sent to Identity Stores - mainly for (re)initialization purposes; for each external resource, one or more push tasks can be defined, run and scheduled for period execution.
Push task execution involves querying the internal storage and then processing each entity in an isolated transaction; an internal entity can be:
-
matching if a corresponding remote entity was found, according to the push policy set for the enclosing external resource;
-
unmatching otherwise.
Once this has been assessed, entities are processed according to the matching / unmatching rules specified for the push task: by default, unmatching entities are pushed to Identity Stores, and matching entities are updated.
PushActions
The push process can be decorated with custom logic to be invoked around task execution, by associating push tasks to one or more implementations of the PushActions interface.
3.9. Policies
Policies control different aspects of the provisioning process. They can be used to fine-tune and adapt the overall mechanism to the particularities of the specific domain in which a given Apache Syncope deployment is running.
|
Policy Composition
When defining policies and associating them with different realms and resources, it is common to observe that several policies of the same type have to be enforced on the same user, group or any object. In such cases, Apache Syncope transparently composes all of the candidate policies and obtains a single applicable policy which contains all the conditions of the composing policies; this process, however, is not guaranteed to be successful, as different policies of the same type might provide conflicting clauses. |
3.9.1. Account
Account policies allow the imposition of constraints on username values, and are involved in the authentication process.
|
When set for realm R, an account policy is enforced on all Users of R and sub-realms. When set for resource R, an account policy is enforced on all Users that have R assigned. |
When defining an account policy, the following information must be provided:
-
max authentication attempts - how many times Users are allowed to fail authentication before getting suspended
-
propagate suspension - when suspended as a consequence of too many authentication failures, should Users also be suspended on associated resources or not?
-
pass-through resources - which external resources are involved with pass-through authentication
-
rules - set of account rules to evaluate with the current policy
Account Rules
Account rules define constraints to apply to username values.
Some implementations are provided out-of-the-box, custom ones can be provided on given deployment.
|
As
As |
Default Account Rule
The default account rule (enforced by DefaultAccountRule and configurable via DefaultAccountRuleConf ) contains the following controls:
-
maximum length - the maximum length to allow;
0means no limit set; -
minimum length - the minimum length to allow;
0means no limit set; -
pattern - Java regular expression pattern to match;
NULLmeans no match is attempted; -
all uppercase - are lowercase characters allowed?
-
all lowercase - are uppercase characters allowed?
-
words not permitted - list of words that cannot be present, even as a substring;
-
schemas not permitted - list of schemas whose values cannot be present, even as a substring;
-
prefixes not permitted - list of strings that cannot be present as a prefix;
-
suffixes not permitted - list of strings that cannot be present as a suffix.
Before being able to configure the default account rule as mentioned above, you will need to first create a JAVA
ACCOUNT_RULE implementation for the org.apache.syncope.common.lib.policy.DefaultAccountRuleConf
class.
|
Pass-through Authentication
During user authentication, if the resulting applicable account policy defines pass-through
resources, the provided credentials are verified first against the internal storage, then against each configured
external resource (provided that the underlying connector instance has the AUTHENTICATE
capability set): the first check that succeeds will successfully authenticate the user.
This feature allows, for example, to reuse credentials contained in Identity Stores (without extracting them), instead of storing password values in the internal storage. It also facilitates implementing authentication chains.
3.9.2. Password
Password policies allow the imposition of constraints on password values.
|
When set for realm R, a password policy is enforced on all Users of R and sub-realms. When set for resource R, a password policy is enforced on all Users that have R assigned. |
When defining a password policy, the following information must be provided:
-
allow null password - whether a password is mandatory for Users or not
-
history length - how many values shall be considered in the history
-
rules - set of password rules to evaluate with the current policy
Password Rules
Password rules define constraints to apply to password values.
Some implementations are provided out-of-the-box, custom ones can be provided on given deployment.
|
As
As |
Default Password Rule
The default password rule (enforced by DefaultPasswordRule and configurable via DefaultPasswordRuleConf ) contains the following controls:
-
maximum length - the maximum length to allow;
0means no limit set; -
minimum length - the minimum length to allow;
0means no limit set; -
non-alphanumeric required
-
alphanumeric required
-
digit required
-
lowercase required
-
uppercase required
-
must start with digit
-
must not start with digit
-
must end with digit
-
must not end with digit
-
must start with alphanumeric
-
must start with non-alphanumeric
-
must not start with alphanumeric
-
must not start with non-alphanumeric
-
must end with alphanumeric
-
must end with non-alphanumeric
-
must not end with alphanumeric
-
must not end with non-alphanumeric
-
username allowed - whether a username value can be used
-
words not permitted - list of words that cannot be present, even as a substring;
-
schemas not permitted - list of schemas whose values cannot be present, even as a substring;
-
prefixes not permitted - list of strings that cannot be present as a prefix;
-
suffixes not permitted - list of strings that cannot be present as a suffix.
Before being able to configure the default password rule as mentioned above, you will need to first create a JAVA
PASSWORD_RULE implementation for the org.apache.syncope.common.lib.policy.DefaultPasswordRuleConf
class.
|
"Have I Been Pwned?" Password Rule
This password rule (enforced by HaveIBeenPwnedPasswordRule and configurable via HaveIBeenPwnedPasswordRuleConf ) checks the provided password values against the popular "Have I Been Pwned?" service.
Before being able to configure the "Have I Been Pwned?" password rule as mentioned above, you will need to first create
a JAVA PASSWORD_RULE implementation for the
org.apache.syncope.common.lib.policy.HaveIBeenPwnedPasswordRuleConf class.
|
3.9.3. Propagation
Propagation policies are evaluated during the execution of propagation tasks and are meant to retry the configured operations in case of propagation failures.
When defining a propagation policy, the following information must be provided:
-
max number of attempts
-
back-off strategy
-
FIXED- pauses for a fixed period of time before continuing -
EXPONENTIAL- increases the back off period for each retry attempt in a given set up to a limit -
RANDOM- chooses a random multiple of the interval that would come from a simple deterministic exponential
-
3.9.4. Pull
Pull policies are evaluated during the execution of pull tasks and are meant to:
-
help match existing Users, Groups and Any Objects during pull, thus generating update events (rather than create)
-
determine which action shall be taken in case such match is not unique (e.g. what to do if the same external account can be mapped to two distinct Users in Apache Syncope?)
|
When set for resource R, a pull policy is enforced on all Users, Groups and Any Objects pulled from R. |
When defining a pull policy, the following information must be provided:
-
conflict resolution action
-
IGNORE- do nothing -
FIRSTMATCH- pull first matching object only -
LASTMATCH- pull last matching object only -
ALL- pull all matching objects
-
-
rules - set of correlation rules to evaluate with the current policy; for each defined Any Type, a different rule is required
Pull Correlation Rules
Pull correlation rules define how to match objects received from External Resources with existing Users (including Linked Accounts), Groups or Any Objects.
The default implementation attempts to match entities on the basis of the values of the provided plain attributes, according to the available mapping.
|
Custom pull correlation rules can be provided by implementing the PullCorrelationRule interface. |
3.9.5. Push
Push policies are evaluated during the execution of push tasks.
|
When set for resource R, a push policy is enforced on all Users, Groups and Any Objects pushed to R. |
Push Correlation Rules
Push correlation rules define how to match Users (including Linked Accounts), Groups or Any Objects with objects existing on External Resources.
The default ] implementation attempts to match entities on the basis of the values of the provided plain attributes, according to the available mapping.
|
Custom push correlation rules can be provided by implementing the PushCorrelationRule interface. |
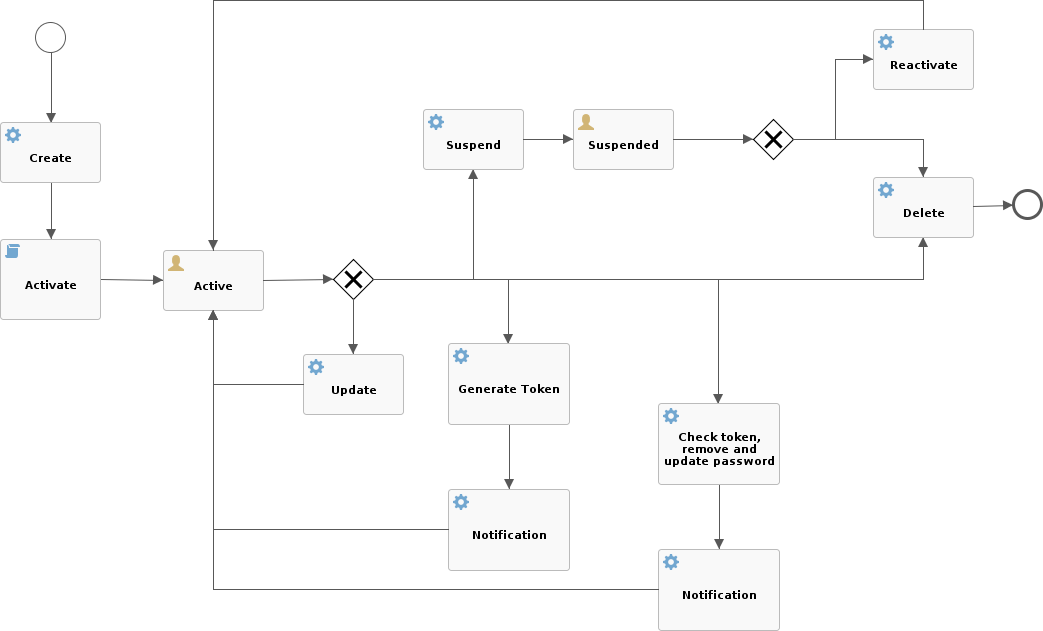
3.10. Workflow
Workflow manages the internal identity lifecycle by defining statuses and transitions that every user, group or any object in Apache Syncope will traverse. A workflow instance is started once identities get created, and shut down when they are removed.
Workflow is triggered during the provisioning process as the first step in creating, updating or deleting identities into the internal storage.
|
Workflow Adapters
The workflow features are defined by the workflow adapter interfaces: Default implementations are available: |
|
Which workflow adapter for users?
|
3.10.1. Flowable User Workflow Adapter
An advanced adapter is provided for Users, based on Flowable, one of reference open source BPMN 2.0 implementations.
The FlowableUserWorkflowAdapter is bootstrapped from userWorkflow.bpmn20.xml and presents several advantages and more features, if compared to the default user adapter:
-
Besides mandatory statuses, which are modeled as BPMN
userTaskinstances, more can be freely added at runtime, provided that adequate transitions and conditions are also inserted; more details about available BPMN constructs are available in the Flowable User Guide.
Additional statuses and transitions allow the internal processes of Apache Syncope to better adapt to suit organizational flows. -
Custom logic can be injected into the workflow process by providing BPMN
serviceTaskinstances. -
Flowable forms are used for implementing approval.
-
The Flowable Modeler is available with the admin console, thus allowing web-based graphical modeling of the workflow definition.
Approval
Every transition in the Flowable user workflow definition can be subjected to approval.
The underlying idea is that some kind of self-modifications (group memberships, external resource assignments, …) might not be allowed to 'plain' Users, as there could be conditions which require management approval. Managers could also be asked to complete the information provided before the requested operation is finished.
In order to define an approval form, a dedicated BPMN userTask needs to be defined, following the rules established
for Flowable forms.
|
What is required for administrators to manage approval?
The following conditions must be met, for an User
The special super-user |
The snippet below shows how to define an approval form in XML; the same operation can be performed via the Flowable Modeler.
<userTask id="createApproval" name="Create approval"
          flowable:candidateGroups="managingDirector" flowable:formKey="createApproval"> (1)
  <extensionElements>
    <flowable:formProperty id="username" name="Username" type="string"
                           expression="${userTO.username}" writable="false"/> (2)
    <flowable:formProperty id="approve" name="Approve?" type="boolean"
                           variable="approve" required="true"/> (3)
    <flowable:formProperty id="rejectReason" name="Reason for rejecting" type="string"
                           variable="rejectReason"/>
  </extensionElements>
</userTask>| 1 | formKey and id must be unique across the workflow definition, name is displayed by the admin console;
candidateGroups and candidateUsers might be defined, even both, to indicate which Groups or Users should be
managing these approvals; if none are specified, only admin is entitled to manage such approval |
| 2 | expression will be evaluated against the current requesting user (as workflow variable) and related properties;
read-only form input can be defined by setting writable="false" |
| 3 | exporting approval inputs into workflow variables is possible via the variable attribute; required form input can
be defined by setting required="true" |
Once the form is defined, any modification subject to that approval will be manageable via the admin console, according to the following flow (the actual operations on the admin console for the sample above are reported below):
-
administrator A sees the new approval notifications
-
administrator A claims the approval and is then allowed to manage it
-
administrator A reviews the updated user, with ongoing modification applied (no actual modification performed yet)
-
administrator A can approve or reject such modification
Request Management
Request management is a key-feature of Identity Governance and allows to define and manage, in a structured way,
whatever process intended to update identity attributes, memberships and relationships.
Request examples are "assign mobile phone", "grant groups on AD" or "consent access to application".
Users can initiate whichever request among the ones defined; once initiated, such requests will follow their own path, which might also include one or more approval steps.
The BPMN process below shows how to define an user request in XML; the same operation can be performed via the Flowable Modeler.
In this user request definition:
-
user selects one of printers defined in the system, for self-assignment
-
administrator approves user’s selection
-
a relationship between user and printer is established
<process id="assignPrinterRequest" name="Assign printer" isExecutable="true">
  <startEvent id="startevent1" name="Start"/>
  <endEvent id="endevent1" name="End"/>
  <sequenceFlow id="flow1" sourceRef="startevent1" targetRef="selectPrinter"/>
  <userTask id="selectPrinter" name="Select printer" flowable:formKey="selectPrinter"
            flowable:assignee="${wfExecutor}"> (1)
    <extensionElements>
      <flowable:formProperty id="printer" name="Printer"
                             variable="printer" type="dropdown" required="true"> (2)
        <flowable:value id="dropdownValueProvider" name="printersValueProvider"/>
      </flowable:formProperty>
      <flowable:formProperty id="printMode" name="Preferred print mode?" type="enum">
        <flowable:value id="bw" name="Black / White"/>
        <flowable:value id="color" name="Color"/>
      </flowable:formProperty>
    </extensionElements>
  </userTask>
  <userTask id="approvePrinter" name="Approve printer" flowable:formKey="approvePrinter"> (3)
    <extensionElements>
      <flowable:formProperty id="username" name="Username" type="string"
                             expression="${userTO.username}" writable="false"/>
      <flowable:formProperty id="printer" name="Selected printer" type="string"
                             expression="${printer}" writable="false"/>
      <flowable:formProperty id="approve" name="Approve?" type="boolean"
                             variable="approve" required="true"/>
    </extensionElements>
  </userTask>
  <sequenceFlow id="sid-D7047714-8E57-46B8-B6D4-4844DE330329"
                sourceRef="selectPrinter" targetRef="approvePrinter"/>
  <serviceTask id="createARelationship" name="Create ARelationship"
               flowable:delegateExpression="${createARelationship}"/> (4)
  <sequenceFlow id="sid-33880AE7-35C6-4A39-8E5B-12D8BA53F042"
                sourceRef="approvePrinter" targetRef="createARelationship"/>
  <sequenceFlow id="sid-831E1896-EDF9-4F7D-AA42-E86CC1F8C5D3"
                sourceRef="createARelationship" targetRef="endevent1"/>
</process>| 1 | the first form defined is self-assigned to the user which has started this request |
| 2 | the dropdown type is a Syncope extension of the
form property types supported by Flowable
and allows to inject a list of elements via the dropdownValueProvider value (with name printersValueProvider in this
sample), which must be a Spring bean implementing the
DropdownValueProvider
interface |
| 3 | the second form is a traditional approval form, as seen above |
| 4 | this is a FlowableServiceTask implementation which takes care of establishing the relationship |
3.11. Notifications
Apache Syncope can be instructed to send out notification e-mails when certain events occur.
Every notification generates one or more notification tasks, holding the actual
e-mails to be sent. The tasks are ordinarily scheduled for execution according to the value provided for
notificationjob.cronExpression - see below for details - and can be saved for later
re-execution.
When defining a notification, the following information must be provided:
-
notification template - template for e-mail generation
-
sender - e-mail address appearing in the
Fromfield of the generated e-mail(s) -
subject - text used as e-mail subject
-
recipient e-mail attribute - which user attribute shall be considered as e-mail address for delivery (as users might in principle have different e-mail attributes)
-
recipient(s) - the actual e-mail recipient(s) which can be specified either as:
-
list of static e-mail addresses
-
matching condition to be applied to available users
-
Java class implementing the NotificationRecipientsProvider interface
-
-
notification event(s) - event(s) triggering the enclosing notification
-
about - the condition matching Users, Groups or Any Objects which are evaluated for the specified events; for users, the matching entities can be also considered as additional recipients
-
trace level - control how much tracing (including logs and execution details) shall be carried over during execution of the generated notification tasks
3.11.1. Notification Events
Notification (and Audit) events are essentially a means of identifying the invocation of specific methods within the Core, in line with join points in the Aspect Oriented Programming (AOP).
An event is identified by the following five coordinates:
-
type - which can be one of
-
LOGIC -
TASK -
PROPAGATION -
PULL -
PUSH -
CUSTOM
-
-
category - the possible values depend on the selected type: for
LOGICthe Logic components available, forTASKthe various Custom Tasks configured, forPROPAGATION,PULLandPUSHthe defined Any Types -
subcategory - completes category with external resource name, when selecting
PROPAGATION,PULLorPUSH -
event type - the final identification of the event; depends on the other coordinates
-
success or failure - whether the current event shall be considered in case of success or failure
The admin console provides tooling to assist with the specification of valid events.
|
An event is uniquely identified by a string of the following form: Some samples:
|
|
Custom events can be used to trigger notifications from non-predefined joint points, as BPMN |
3.11.2. Notification Templates
A notification template is defined as a pair of JEXL expressions, to be used respectively for plaintext and HTML e-mails, and is available for selection in the notification specification.
|
Notification templates can be easily managed either via the admin console, the Eclipse IDE Plugin or the Netbeans IDE Plugin. |
The full power of JEXL expressions - see reference
and some examples - is available.
For example, the user variable, an instance of
UserTO
with actual value matching the about condition as introduced above, can be used.
Hi ${user.getPlainAttr("firstname").get().values[0]} ${user.getPlainAttr("surname").get().values[0]},
  welcome to Syncope!

Your username is ${user.username}.
Your email address is ${user.getPlainAttr("email").get().values[0]}.

Best regards.<html>
<body>
<h3>Hi ${user.getPlainAttr("firstname").get().values[0]} ${user.getPlainAttr("surname").get().values[0]},
welcome to Syncope!</h3>
<p>Your username is ${user.username}.<br/>
Your email address is ${user.getPlainAttr("email").get().values[0]}.</p>
<p>Best regards.</p>
</body>
</html>3.12. Tasks
Tasks control the effective operations that are ongoing in the Core.
Whilst tasks define what and how to perform, they are supposed to be run by some entity (depending on the actual task type, see below for details); their execution result can be saved for later examination.
3.12.1. Propagation
A propagation task encapsulates all the information that is required - according to the defined mapping - to create, update or delete a given User, Group or Any Object, to / from a certain Identity Store:
-
operation -
CREATE,UPDATEorDELETE -
connObjectKey - value for ConnId unique identifier on the Identity Store
-
oldConnObjectKey - the former unique identifier on the Identity Store: bears value only during updates involving the unique identifier
-
attributes - set of ConnId attributes built upon internal identity data and configured mapping
-
resource - related external resource
-
objectClass - ConnId object class
-
entity - reference to the internal identity: User, Group or Any Object
|
Propagation tasks are automatically generated via the PropagationManager, executed (by default) via the PriorityPropagationTaskExecutor during the propagation process, and are permanently saved - for later re-execution or for examining the execution details - depending on the trace levels set on the related external resource. Automatic retry in case of failure can be configured by mean of a propagation policy, for the related external resource. |
3.12.2. Pull
Pull tasks are required to define and trigger the pull process from Identity Stores.
When defining a pull task, the following information must be provided:
-
related external resource
-
chosen pull mode
-
destination Realm - where entities selected for creation are going to be placed
-
whether creation, update or deletion on internal storage are allowed or not
-
whether remediation is enabled
-
whether to synchronize the status information from the related identity store
-
selected matching and unmatching rules
-
optional pull action(s)
-
scheduling information:
-
when to start
-
|
Pull tasks are executed, either upon request or due to a schedule, via the PullJobDelegate during the pull process, and are permanently saved - for later re-execution or for examining the execution details - depending on the trace level set on the related external resource. |
|
DryRun
It is possible to simulate the execution of a pull (or push) task without performing any actual modification by selecting the DryRun option. The execution results will be still available for examination. |
3.12.3. Push
Push tasks are required to define and trigger the push process to Identity Stores.
When defining a push task, the following information must be provided:
-
related external resource
-
source Realm - where entities to push will be read from
-
filter information for selecting which internal entities will be pushed onto the identity store
-
whether creation, update or deletion on the identity store are allowed or not
-
whether to synchronize the status information with internal storage
-
selected matching and unmatching rules
-
optional push action(s)
-
scheduling information:
-
when to start
-
|
Push tasks are executed, either upon request or due to a schedule, via the PushJobDelegate during the push process, and are permanently saved - for later re-execution or for examining the execution details - depending on the trace level set on the related external resource. |
3.12.4. Notification
A notification task encapsulates all the information that is required to send out a notification e-mail, according to the specification provided in a given notification:
-
entity - reference to the internal identity - User, Group or Any Object - the notification task refers to
-
sender e-mail address
-
e-mail subject
-
effective e-mail recipient(s)
-
e-mail body as plaintext and / or HTML
|
Notification tasks are automatically generated via the NotificationManager, executed via the NotificationJob and are permanently saved - for later re-execution or for examining the execution details - depending on the trace level set on the related notification. |
3.12.5. Custom
Custom tasks allow for the injection of logic into the Core in the area of execution and scheduling.
When defining a custom task, the following information must be provided:
-
job delegate class: Java class extending AbstractSchedTaskJobDelegate providing the custom logic to execute
-
scheduling information:
-
when to start
-
|
Custom tasks are ideal for implementing periodic checks or clean-up operations, possibly in coordination with other components; some examples:
|
3.13. Reports
Reports are a powerful tool to extract, filter and format relevant information from a running Apache Syncope deployment, for a wide range of purposes: from business to DevOps.
A report is essentially defined by a template and a sequence of reportlets, where the latter is responsible for extracting the required information and the former defines how execution results will be presented, in the various available formats.
Reports can be executed upon request or scheduled: execution results can be downloaded as:
3.13.1. Report Templates
A report template is defined as a triple of XSLT documents, distinguished by their target format:
-
FO- transforms the given report result as XSL-FO, which will be then made available as PDF and RTF -
HTML- outputs the given report result as HTML -
CSV- outputs the given report result as CSV
|
Report templates can be easily managed either via the admin console, the Eclipse IDE Plugin or the Netbeans IDE Plugin. |
3.13.2. Reportlets
Reportlets are the building blocks of reports.
Each reportlet is composed by:
-
a Java class extending AbstractReportlet and implementing the information extraction logic and generating an XML stream as result
-
a Java class extending AbstractReportletConf and embedding the configuration options that can be tuned when incorporating a given reportlet into a report; when properly annotated, such options are manageable via the admin console
Some reportlets are available by default (and briefly presented below) either for direct usage or for acting as a reference when building new reportlets for specific Apache Syncope deployments.
Static Reportlet
Defined by StaticReportlet and StaticReportletConf, it is essentially a handy way to inject static values (of various types) into a report.
User and Group Reportlets
Defined by UserReportlet and UserReportletConf, it can be used to report various information about Users available in the internal storage, their attributes, memberships and relationships, external resources and so on.
A similar reportlet is also available for Groups, defined by GroupReportlet and GroupReportletConf.
Reconciliation Reportlet
Defined by ReconciliationReportlet and ReconciliationReportletConf, it provides the global reconciliation status for all Users, Groups and Any Objects available in the internal storage, e.g. whether such entities are available on all Identity Stores matching the assigned external resources and, if so, whether the mapped attributes feature the expected values.
An instance of reconciliation reportlet is run by default from the admin console’s dashboard, and results are available as a widget.
Audit Reportlet
Defined by AuditReportlet and AuditReportletConf, it is mostly a sample reportlet showing how to extract data produced by Audit.
3.14. Audit
The audit feature allows to capture events occurring within the Core and to log relevant information
about them.
By default, events are logged as entries into the SYNCOPEAUDIT table of the internal storage.
Audit events can also be processed differently, for example when using the Elasticsearch extension.
Once events are reported, they can be used as input for external tools.
|
An example of how audit entries can be extracted for reporting is shown by the Audit Reportlet. |
3.14.1. Audit Events
The information provided for notification events is also valid for audit events, including examples - except for the admin console tooling, which is naturally distinct.
3.14.2. Audit Appenders
In addition to default processing, events are also available for custom handling via Audit
Appenders, based on Apache Log4j 2 Appenders.
This allows to empower the available implementations or to write new ones in order to route audit messages, with optional
transformation (rewrite), to files, queues, sockets, syslog, etc.
Custom implementations must follow the AuditAppender interface.
Some convenience implementations are provided, meant to serve as reference - see table below.
This requires to specify (a) a set of events to which the appender is bound (log only if one of such events occurs) and (b) a target appender, e.g. one of Apache Log4j 2 Appenders or a custom implementation. |
|
In addition, this requires to provide a RewritePolicy implementation, which allows to rewrite the original audit message into something more suitable to the target destination. |
3.15. Domains
Domains are built to facilitate multitenancy.
Domains allow the physical separation of all data managed by Apache Syncope, by storing the data for different domains into different database instances. Therefore, Apache Syncope can facilitate Users, Groups, Any Objects, External Resources, Policies, Tasks, etc. from different domains (e.g. tenants) in a single Core instance.
By default, a single Master domain is defined, which also bears the configuration for additional domains.

|
Each domain’s persistence unit can be configured to work with one of the supported DBMSes: |
3.16. Implementations
Starting with Apache Syncope 2.1, it is possible to provide implementations suitable for customization as:
-
Java classes
-
Apache Groovy classes
While the former shows some advantages about execution performance, the latter is extremely useful as it allows for runtime updates, freeing from the hassle to redeploy when something needs to be changed.
|
With great power comes great responsibility
Customizing and extending the Core behavior by uploading a Groovy class via REST adds further flexibility to the platform, allows to speed up the development cycle and can be used as Swiss army knife for maintenance and administration. Please beware that granting the permission to manage Implementations to non-admin users can result in security threat, as there is virtually no limitation in what the Groovy code has access to. |
3.17. Extensions
The vanilla Apache Syncope deployment can be optional enriched with useful features via an Extension, instead of bloating every single deployment with unneeded libraries and configurations.
With reference to architecture, an extension might add a REST endpoint, manage the persistence of additional entities, extend the security mechanisms, tweak the provisioning layer, add features to the Admin UI or the End-user UI, or even bring all such things together.
Extensions are available from different sources:
-
as Maven artifacts published from the Apache Syncope codebase, part of the official releases - this is the case of the ones detailed below;
-
as Maven artifacts published by third parties;
-
as part of a given deployment source code, as explained in the following.
3.17.1. Apache Camel Provisioning Manager
This extension delegates the provisioning process execution to a set of Apache Camel routes.
The pre-loaded routes can be dynamically changed at runtime via REST or admin console, and modifications are immediately made available for processing.
For example, on creating a new user, you may wish to send an email to an administrator; or if a user is
reactivated, you may wish to reactivate the user’s home page on a web server.
All these things and more are possible using the myriad of
components that are available to be used in Apache Camel routes.
|
Extension Sources
The source code of this extension is available from the Apache Syncope source tree . |
3.17.2. Swagger
This extension enables Swagger UI as web interface for dealing with Apache Syncope RESTful services.
Once installed, Swagger UI is available at
protocol://host:port/syncope/swagger/
where protocol, host and port reflect your Java EE container installation.
|
Extension Sources
The source code of this extension is available from the Apache Syncope source tree . |
3.17.3. SAML 2.0 Service Provider
This extension can be leveraged to provide SAML 2.0-based Single Sign-On access to the Admin UI, the End-user UI or any other Java EE application dealing with the Core.
Once installed, one or more Identity Providers can be imported from their metadata. For each Identity Provider, it is to configure which one of the attributes - returned as part of the assertion containing the attribute statements - is going to be used by Syncope to match the internal users.
|
Extension Sources
The source code of this extension is available from the Apache Syncope source tree . |
|
This extension adds features to all components and layers that are available, and can be taken as reference when creating new extensions. |
3.17.4. OpenID Connect Client
This extension can be leveraged to provide OpenID Connect-based Single Sign-On access to the Admin UI, the End-user UI or any other Java EE application dealing with the Core.
Once installed, one or more OpenID Providers can be created either from the discovery document if it is supported or from inserting manually the required attributes, in any case the client_id and the secret_id from the OAuth 2.0 credential and the issuer are required. After configuration the OpenID provider, the Authorization Code Flow is going to be implemented in order to reach the user information to be used by Syncope to match the internal users.
|
Extension Sources
The source code of this extension is available from the Apache Syncope source tree . |
|
This extension adds features to all components and layers that are available, and can be taken as reference when creating new extensions. |
3.17.5. Elasticsearch
This extension provides an alternate internal search engine for Users, Groups and Any Objects and Audit Events, requiring an external Elasticsearch cluster.
| This extension supports Elasticsearch server versions starting from 7.x. |
| As search operations are central for different aspects of the provisioning process, the global performances are expected to improve when using this extension. |
|
Extension Sources
The source code of this extension is available from the Apache Syncope source tree . |
3.17.6. SCIM
SCIM (System for Cross-domain Identity Management) 2.0 is the open API for managing identities, published under the IETF:
This extension enables an additional /scim REST endpoint, implementing the communication according to the SCIM 2.0
standard, in order to provision User, Enterprise User and Group SCIM entities to Apache Syncope.
|
Extension Sources
The source code of this extension is available from the Apache Syncope source tree . |
4. Working with Apache Syncope
Before proceeding, please ensure that you have access to a running Apache Syncope deployment. You can take a look at the Apache Syncope Getting Started Guide to check system requirements and to choose among the various options for obtaining Apache Syncope.
4.1. Admin Console
Once the Java EE container has initialized, the admin console can be accessed at:
protocol://host:port/syncope-console/
where protocol, host and port reflect your Java EE container installation.
You should be greeted by the following web page.
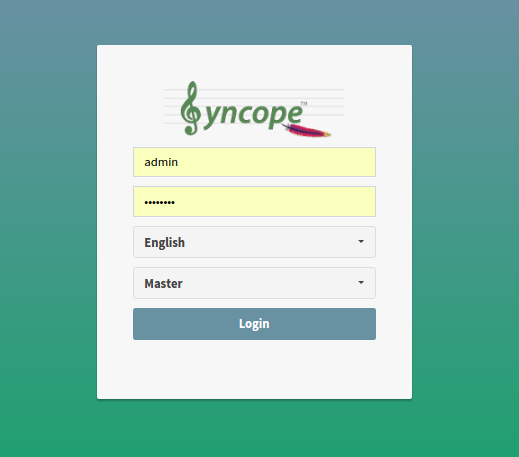
You can use the default admin credentials to login.
4.1.1. Pages
Dashboard
The dashboard provides an overall view of the current state of the Apache Syncope deployment. It consists of various widgets and tabs that show the different metrics and details of each component that is available.

Realms
The realms page provides the designated administrators with the power to manage Realms as well as Users, Groups and Any Objects, for all Any Types that are defined.
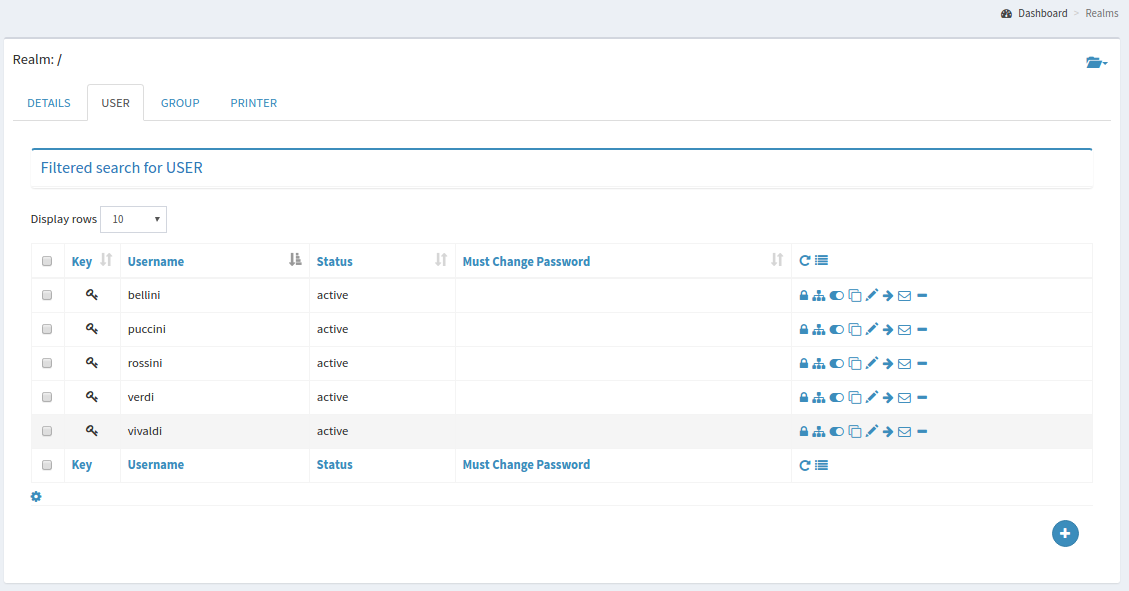
Topology
The topology page provides a mapped view of the connectors and
external resources that are available and configured in the given deployment.
Different actions are available when clicking on the various nodes.
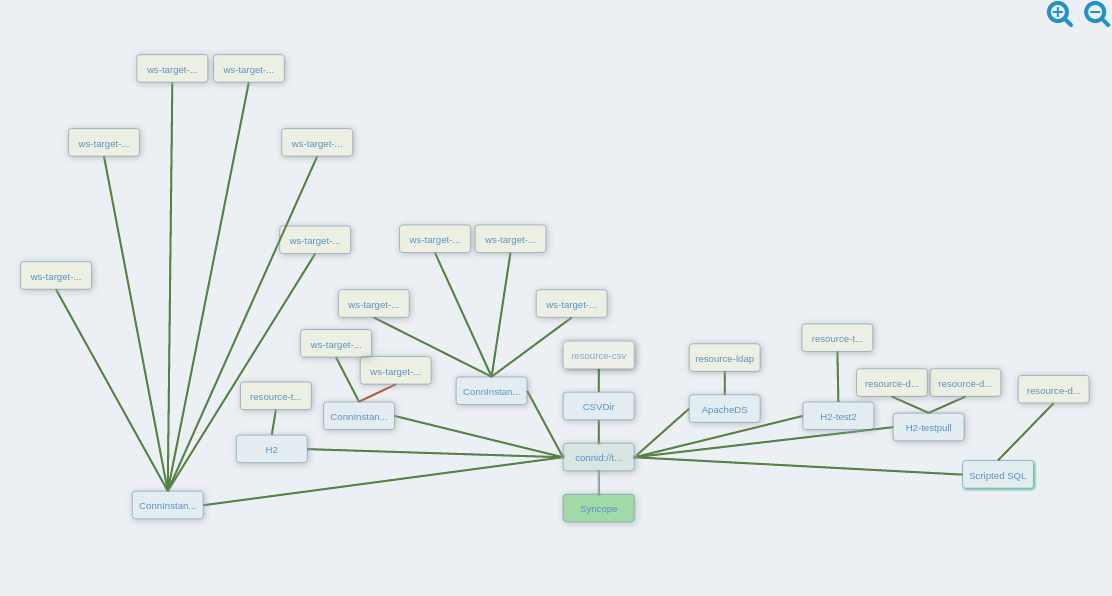
Reports
The reports page presents the designated administrators with the list of reports configured on the given
deployment.
This page also allows the administratorss to create and edit report templates.
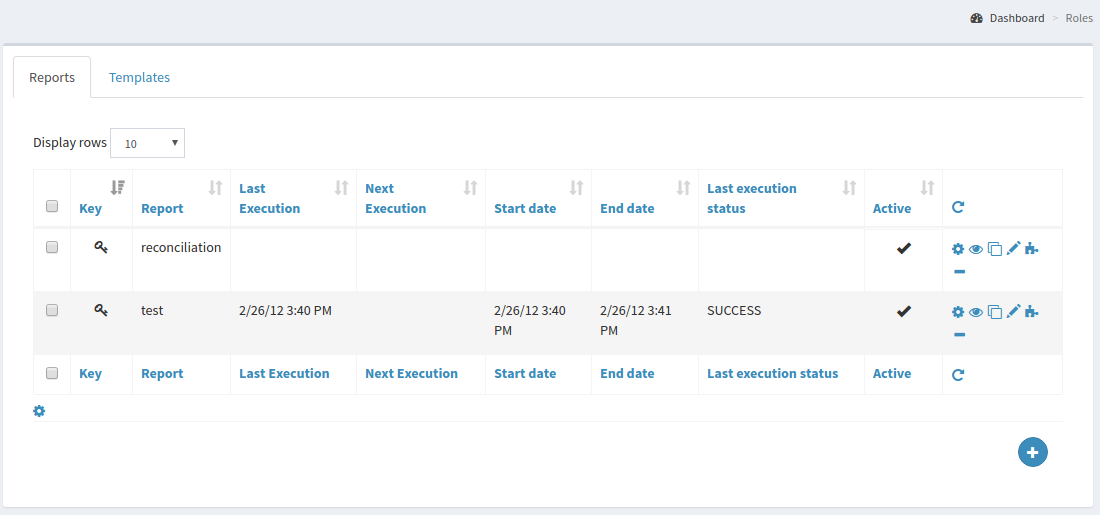
Configuration
The configuration pages allow the designated administrators to customize the given deployment to fit the needs of the organization.
- Audit
-
Controls the configuration of the auditing features.
- Logs
-
The logging levels available can be dynamically adjusted; for example, the admin can set it to display only the errors of
io.swagger, in which case the warning and information logs will not be reported.
- Notifications
-
Gives access to the notification management.
This page also allows the administrators to create and edit notification templates.
- Parameters
-
Presents the administrators with the list of defined configuration parameters used in the given deployment such as
token.expireTimeandpassword.cipher.algorithm. These can be edited to further customize the deployment.
New parameters can also be added, for use with custom code.
- Roles
-
Displays and provides editing functionality for roles.
- Security Questions
-
The administrators can use this page to define a set of security questions which the users can choose from when managing their own profile, to allow them to recover their account in case of a forgotten password.
Approval
The images below refer to the self-registration approval sample and to the typical approval flow as explained above.


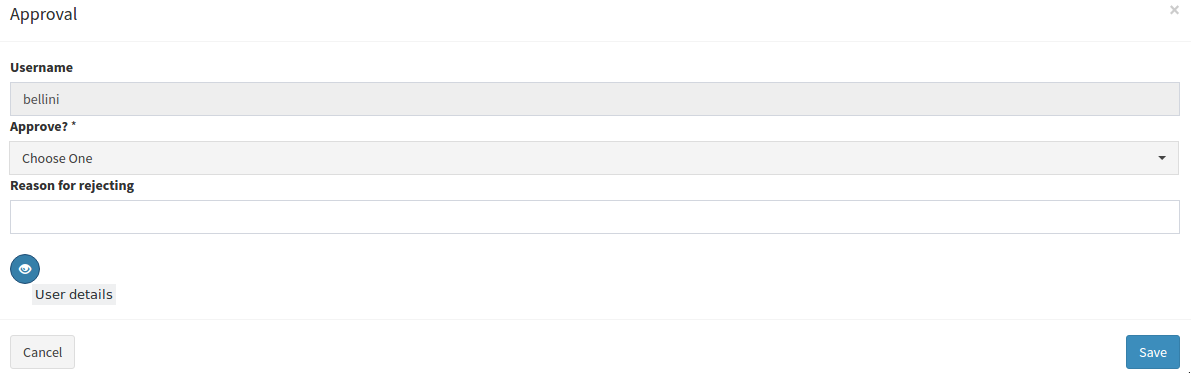


Extensions
The extensions configured for the given deployment are dynamically reported in the navigation menu: each extension generally produces one or more pages and makes one or more widgets available in the dashboard.
4.2. Enduser Application
Once the Java EE container has initialized, the enduser application can be accessed at:
protocol://host:port/syncope-enduser/
where protocol, host and port reflect your Java EE container installation.
The scope of the enduser application is primarily to provide a dedicated web-based entry-point for self-registration, self-service and password reset.
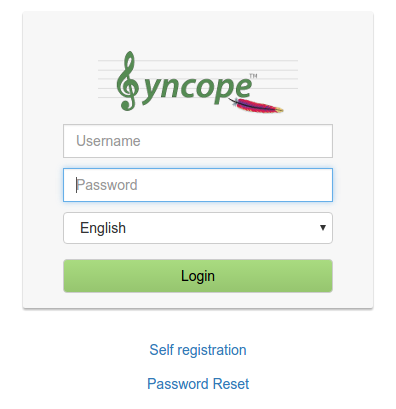
Usually, organizations tend to require deep customizations not only in the appearance but often also in the actual
mechanisms behind, in order to best suit their processes and flows.
This is the main reason why the enduser application is composed of an
AngularJS frontend - which eases extension and full customization - featured by an
Apache Wicket backend - which proxies access to the Core, thus skipping several security
concerns at a glance.
Nonetheless, the introduction of a client-side technology as AngularJS brought some important security issues to
attention; above all, CRSF /
XSRF and BOT
attacks.
The enduser application offers protection mechanisms against all of them, and optionally consent to embed external
features as Google re-Captcha.
While full-fledged front-end features are provided, it is important to highlight how these are primarily meant for customization on a given deployment.
4.3. CLI
| Examples in this document are executed on GNU / Linux with debug environment. |
4.3.1. Commands
Schema command
This command works with schemas.
Help message
Usage: schema [options]
  Options:
    --help
    --details
    --list-all
    --list-plain
    --list-derived
    --list-virtual
    --read {SCHEMA-TYPE} {SCHEMA-KEY}
        Schema type: PLAIN / DERIVED / VIRTUAL
    --delete {SCHEMA-TYPE} {SCHEMA-KEY}
        Schema type: PLAIN / DERIVED / VIRTUAL
Options
- --details
-
This option shows a table with some details about the schemas and their categories.
- --list-all
-
Running the command with this option you will see the list of all (PLAIN, DERIVED, VIRTUAL) schemas configured.
- --list-plain
-
Running the command with this option you will see the list of the plain schemas available in Syncope.
- --list-derived
-
Running the command with this option you will see the list of the derived schemas available in Syncope with their expressions.
- --list-virtual
-
Running the command with this option you will see the list of the virtual schemas available in Syncope.
- --read
-
The option to read all the information of a specified schema.
- --delete
-
The option to delete a specified schema.
Connector command
This command works with connectors.
Help message
Usage: connector [options]
  Options:
    --help
    --details
    --list
    --list-bundles
    --list-configuration-properties
       Syntax: --list-configuration-properties {CONNECTOR-KEY} {CONNECTOR-KEY} [...]
    --read
       Syntax: --read {CONNECTOR-KEY} {CONNECTOR-KEY} [...]
    --delete
       Syntax: --delete {CONNECTOR-KEY} {CONNECTOR-KEY} [...]
Options
- --details
-
This option shows a table with some details about connectors and bundles.
- --list
-
Running the command with this option you will see the list of connectors with their configuration.
- --list-bundles
-
Running the command with this option you will see the list of the bundles available in Syncope.
- --list-configuration-properties
-
This option lists the configuration of specified connectors.
- --read
-
The option to read all the information of specified connectors.
- --delete
-
The option to delete a specified connector.
Resource command
This command works with external resources.
Help message
Usage: resource [options]
  Options:
    --help
    --details
    --list
    --read
       Syntax: --read {RESOURCE-KEY} {RESOURCE-KEY} [...]
    --delete
       Syntax: --delete {RESOURCE-KEY} {RESOURCE-KEY} [...]
Options
- --details
-
This option shows a table with the amount of available resources.
- --list
-
Running the command with this option you will see the list of resources.
- --read
-
The option to read all the information of a specified resource.
- --delete
-
The option to delete a specified resource.
User command
This command works with users.
Help message
Usage: user [options]
  Options:
    --help
    --list
    --details
    --get-user-key
       Syntax: --get-user-key {USERNAME} {USERNAME} [...]
    --get-username
       Syntax: --get-username {USER-KEY} {USER-KEY} [...]
    --read-by-username
       Syntax: --read-by-username {USERNAME} {USERNAME} [...]
    --read-by-userkey
       Syntax: --read-by-userkey {USER-KEY} {USER-KEY} [...]
    --search-by-attribute
       Syntax: --search-by-attribute {REALM} {ATTR-NAME}={ATTR-VALUE}
    --search-by-role
       Syntax: --search-by-role {REALM} {ROLE-KEY}
    --search-by-resource
       Syntax: --search-by-resource {REALM} {RESOURCE-KEY}
    --delete
       Syntax: --delete {USER-KEY} {USER-KEY} [...]
    --delete-all
       Syntax: --delete-all {REALM}
    --delete-by-attribute
       Syntax: --delete-by-attribute {REALM} {ATTR-NAME}={ATTR-VALUE}
Options
- --details
-
This option shows a table with some details about the Users.
- --list
-
Running the command with this option you will see the list of all Users in the environment. However, the system will ask you a confirmation before execution, because as you can imagine this operation might produce a very large output.
- --get-user-key
-
The option to get the user key starting from a username.
- --get-username
-
The option to get the username starting from a user key.
- --read-by-userkey
-
The option to read user information by their user key.
- --read-by-username
-
The option to read user information by their username.
- --search-by-attribute
-
The option to search a list of Users with a common attribute.
- --search-by-role
-
The option to search a list of Users with a specified role.
- --search-by-resource
-
The option to search a list of Users with a specified resource.
- --delete
-
The option to delete a specified user.
- --delete-by-attribute
-
The option to delete the Users with a common attribute.
- --delete-all
-
The option to delete all Users of the realm passed as input.
Group command
This command works with groups.
Help message
Usage: group [options]
  Options:
    --help
    --details
    --list
    --read
       Syntax: --read {GROUP-KEY} {GROUP-KEY} [...]
    --read-attr-by-schema-type {GROUP-KEY} {SCHEMA-TYPE}
       Schema type: PLAIN / DERIVED / VIRTUAL
    --read-attr-by-schema {GROUP-KEY} {SCHEMA-TYPE} {SCHEMA-NAME}
       Schema type: PLAIN / DERIVED / VIRTUAL
    --delete
       Syntax: --delete {GROUP-KEY} {GROUP-KEY} [...]
Options
- --details
-
This option shows a table with the amount of available Groups and some additional information.
- --list
-
Running the command with this option you will see the list of the Groups.
- --read
-
The option to read the group passed as input.
- --read-attr-by-schema-type
-
The option to read the specified attribute type of the group passed as input.
- --read-attr-by-schema
-
The option to read the specified attribute name of the group passed as input.
- --delete
-
The option to delete a specified group.
Any command
This command works with any objects.
Help message
Usage: any [options]
  Options:
    --help
    --details
    --list
    --read
       Syntax: --read {ANY_OBJECT-KEY} {ANY_OBJECT-KEY} [...]
    --read-attr-by-schema-type {ANY_OBJECT-KEY} {SCHEMA-TYPE}
       Schema type: PLAIN / DERIVED / VIRTUAL
    --read-attr-by-schema {ANY_OBJECT-KEY} {SCHEMA-TYPE} {SCHEMA-NAME}
       Schema type: PLAIN / DERIVED / VIRTUAL
    --delete
       Syntax: --delete {ANY_OBJECT-KEY} {ANY_OBJECT-KEY} [...]
Options
- --details
-
This option shows a table with the amount of available Any Objects and some additional information.
- --list
-
Running the command with this option you will see the list of the Any Objects.
- --read
-
The option to read the any object passed as input.
- --read-attr-by-schema-type
-
The option to read the specified attribute type of the any object passed as input.
- --read-attr-by-schema
-
The option to read the specified attribute name of the any object passed as input.
- --delete
-
The option to delete a specified any object.
Role command
This command works with roles.
Help message
Usage: role [options]
  Options:
    --help
    --details
    --list
    --read
       Syntax: --read {ROLE-KEY} {ROLE-KEY} [...]
    --delete
       Syntax: --delete {ROLE-KEY} {ROLE-KEY} [...]
Options
- --details
-
This option shows a table with some details about the roles.
- --list
-
Running the command with this option you will see the list of roles with the realm where they are configured and their entitlements.
- --read
-
The option to read all the information of specified roles.
- --delete
-
The option to delete specified roles.
Realm command
This command works with realms.
Help message
Usage: realm [options]
  Options:
    --help
    --details
    --list
Options
- --details
-
This option shows a table with the amount of the available realms.
- --list
-
Running the command with this option you will see the list of the realms.
Question command
This command works with security questions for use with password reset.
Help message
Usage: question [options]
  Options:
    --help
    --list
    --read
       Syntax: --read {QUESTION-KEY} {QUESTION-KEY} [...]
    --delete
       Syntax: --delete {QUESTION-KEY} {QUESTION-KEY} [...]
Options
- --list
-
Running the command with this option you will see the list of questions with their content.
- --read
-
The option to read all the information of specified questions.
- --delete
-
The option to delete a specified question.
Configuration command
This command works with configuration parameters.
Help message
Usage: configuration [options]
  Options:
    --help
    --get
    --read
       Syntax: --read {CONF-NAME} {CONF-NAME} [...]
    --update
       Syntax: --update {CONF-NAME}={CONF-VALUE} {CONF-NAME}={CONF-VALUE} [...]
    --delete
       Syntax: --delete {CONF-NAME} {CONF-NAME} [...]
    --export
       Syntax: --export {WHERE-DIR}
Options
- --get
-
This get option shows a table with the Syncope configuration.
- --read
-
The option to read the value of specified configuration attributes.
- --update
-
The option to update a value of specified configuration attributes.
- --delete
-
The option to delete specified configuration attributes.
- --export
-
The option to export the Syncope configuration to a specified directory.
Logger command
This command is meant for tweaking runtime logger configuration.
Help message
Usage: logger [options]
  Options:
    --help
    --details
    --list-memory-appenders
    --last-statements
       Syntax: --last-statements {APPENDER-NAME}
    --list
    --read
       Syntax: --read {LOG-NAME} {LOG-NAME} [...]
    --update
       Syntax: --update {LOG-NAME}={LOG-LEVEL} {LOG-NAME}={LOG-LEVEL} [...]
    --update-all
       Syntax: --update-all {LOG-LEVEL}
    --create
       Syntax: --create {LOG-NAME}={LOG-LEVEL} {LOG-NAME}={LOG-LEVEL} [...]
    --delete
       Syntax: --delete {LOG-NAME} {LOG-NAME} [...]
Options
- --details
-
This option shows a table with some details about logger configuration.
- --list
-
Running the command with this option you will see the table of the loggers configuration. --list-memory-appenders Running the command with this option you will see the table of the memory appenders, whose last statements can be inspected --last-statements The option to get the last statements available for the passed memory appender
- --read
-
The option to read all the information of specified loggers.
- --update
-
The option to change the value of the logger passed as input.
- --update-all
-
This option is especially helpful in production environment when every log is disabled and you need to change them for a while in DEBUG mode.
- --create
-
The option to add a new logger configuration.
- --delete
-
The option to delete a specified logger.
Task command
This command works with tasks.
Help message
Usage: task [options]
  Options:
    --help
    --details
    --list
       Syntax: --list {TASK-TYPE}
          Task type: NOTIFICATION / PROPAGATION / PUSH / SCHEDULED / PULL
    --list-running-jobs
    --list-scheduled-jobs
    --read
       Syntax: --read {TASK-KEY} {TASK-KEY} [...]
    --read-execution
       Syntax: --read-execution {TASK-EXEC-KEY} {TASK-EXEC-KEY} [...]
    --delete
       Syntax: --delete {TASK-KEY} {TASK-KEY} [...]
    --delete-execution
       Syntax: --delete-execution {TASK-EXEC-KEY} {TASK-EXEC-KEY} [...]
    --execute
       Syntax: --execute {TASK-KEY} {DRY-RUN}
          Dry run: true / false
Options
- --details
-
This option shows a table with some details about tasks and jobs.
- --list
-
Running the command with this option you will see the list of selected tasks type with their information.
- --list-scheduled-jobs
-
Running the command with this option you will see the list of the actual scheduled jobs.
- --list-running-jobs
-
Running the command with this option you will see the list of the actual running jobs.
- --read
-
The option to read all the information of a task.
- --read-execution
-
The option to read all the information of the specified task execution(s).
- --delete
-
The option to delete specified tasks.
- --delete-execution
-
The option to delete the specified task execution(s).
- --execute
-
The option to execute the specified task.
Notification command
This command works with notifications.
Help message
Usage: notification [options]
  Options:
    --help
    --list
    --read
       Syntax: --read {NOTIFICATION-KEY}
    --delete
       Syntax: --delete {NOTIFICATION-KEY}
Options
- --list
-
Running the command with this option you will see the list of notifications with their configuration.
- --read
-
The option to read all the information of the specified notifications.
- --delete
-
The option to delete a specified notification.
Report command
This command works with reports.
Help message
Usage: report [options]
  Options:
    --help
    --details
    --list
    --list-jobs
    --read
       Syntax: --read {REPORT-KEY} {REPORT-KEY} [...]
    --delete
       Syntax: --delete {REPORT-KEY} {REPORT-KEY} [...]
    --execute
       Syntax: --execute {REPORT-KEY}
    --read-execution
       Syntax: --read-execution {EXECUTION-KEY} {EXECUTION-KEY} [...]
    --delete-execution
       Syntax: --delete-execution {EXECUTION-KEY} {EXECUTION-KEY} [...]
    --export-execution-result
       Syntax: --export-execution-result {EXECUTION-KEY} {EXECUTION-KEY} [...] {FORMAT}
          Format: CSV / HTML / PDF / XML / RTF
Options
- --details
-
This option shows a table with some details about the reports and their executions.
- --list
-
Running the command with this option you will see the list of configured reports.
- --list-jobs
-
Running the command with this option you will see the list of the report executions.
- --read
-
The option to read all the information of a specified report.
- --read-execution
-
The option to read all the information of a specified report execution.
- --delete
-
The option to delete a specified report.
- --delete-execution
-
The option to delete a specified report execution.
- --execute
-
The option to run a report.
- --export-execution-result
-
The option to export an execution in a certain format to see the results.
Policy command
This command works with policies.
Help message
Usage: policy [options]
  Options:
    --help
    --details
    --list
       Syntax: --list-policy {POLICY-TYPE}
          Policy type: ACCOUNT / PASSWORD / PULL / PUSH
    --read
       Syntax: --read {POLICY-KEY} {POLICY-KEY} [...]
    --delete
       Syntax: --delete {POLICY-KEY} {POLICY-KEY} [...]
Options
- --details
-
This option shows a table with the amount of policies for each type.
- --list
-
Running the command with this option you will see the list of the policies.
- --read
-
The option to read all the information of a specified policy.
- --delete
-
The option to delete a specified policy.
Info command
This command reports general information about the current Apache Syncope deployment.
Help message
Usage: info [options]
  Options:
    --version
    --pwd-reset-allowed
    --pwd-reset-with-question
    --self-reg-allowed
    --provisioning-manager-classes
    --workflow-adapter-classes
    --account-rules-classes
    --connid-locations
    --reconciliation-filter-builders
    --logic-actions
    --mail-templates
    --mapping-item-transformers
    --password-rules
    --propagation-actions
    --push-actions
    --push-correlation-actions
    --reportlets
    --sync-actions
    --sync-correlation-rules
    --task-jobs
    --validators
    --password-generator
    --vir-attr-cache
    --help
Entitlement command
This command works with entitlements.
Help message
Usage: entitlement [options]
  Options:
    --help
    --list
    --list-role
       Syntax: --list-role {ENTITLEMENT-NAME}
    --read-by-username
       Syntax: --read-by-username {USERNAME}
    --read-by-userkey
       Syntax: --read-by-userkey {USER-KEY}
    --search-by-role
       Syntax: --search-by-role {ROLE-KEY}
Options
- --list
-
Running the command with this option you will see the list of the entitlements.
- --list-role
-
Running the command with this option you will see the list of the roles with a certain entitlement.
- --read-by-username
-
The option to read the entitlements of the username passed as input.
- --read-by-userkey
-
The option to read the entitlements of the user key passed as input.
- --search-by-role
-
The option to read the entitlements of a certain role.
Domain command
This command works with domains.
Help message
Usage: domain [options]
  Options:
    --help
    --details
    --list
    --delete
       Syntax: --delete {DOMAIN-KEY} {DOMAIN-KEY} [...]
Options
- --details
-
This option shows a table with domain amount.
- --list
-
Running the command with this option you will see the list of the domains.
- --delete
-
The option to delete a specified domain.
4.4. RESTful services
All the features provided by the Core are available as RESTful services.
The base URL for invoking such services is normally set as
protocol://host:port/syncope/rest/
where protocol, host and port reflect your Java EE container installation.
|
REST Reference
A complete REST reference generated from WADL is published as well as made available with each deployment at protocol://host:port/syncope/ where |
| The Swagger extension might also help greatly when working with RESTful services. |
4.4.1. REST Authentication and Authorization
The Core authentication and authorization is based on Spring Security.
As an initial step, authentication is required to obtain, in the X-Syncope-Token HTTP header, the
unique signed JSON Web Token to include in all subsequent requests.
By providing the token received in the initial exchange, the requester can be identified and checked for authorization, based on owned entitlements.
Users can examine their own entitlements looking at the X-Syncope-Entitlements
header value, and their own privileges looking at the X-Syncope-Privileges header value.
|
|
The relevant security configuration lies in securityContext.xml; while normally not needed, this configuration can be anyway customized via the override behavior. HTTP Basic Authentication is set for use by default. |
JWTSSOProvider
Besides validating and accepting the JSON Web Tokens generated during the authentication process as sketched above, Apache Syncope can be enabled to cope with tokens generated by third parties, by providing implementations of the JWTSSOProvider interface.
4.4.2. REST Headers
Apache Syncope supports a number of HTTP headers as detailed below, in addition to the common HTTP headers such as
Accept, Content-Type, etc.
It is possible to deal with the headers below when using the Client Library via the SyncopeClient class methods.
|
X-Syncope-Token
X-Syncope-Token is returned on response to successful authentication, and
contains the unique signed JSON Web Token identifying the authenticated
user.
The value returned for the X-Syncope-Token header must be included in all subsequent requests, in order for the
requester to be checked for authorization, as part of the standard Bearer
Authorization header.
curl -I -u admin:password -X POST http://localhost:9080/syncope/rest/accessTokens/login
returns
HTTP/1.1 204
X-Syncope-Token: eyJ0e..
which can then be used to make a call to the REST API
curl -I -H "Authorization: Bearer eyJ0e.." http://localhost:9080/syncope/rest/users/self
The token duration can be configured via the jwt.lifetime.minutes property - see
below for details.
X-Syncope-Domain
X-Syncope-Domain can be optionally set for requests (when not set, Master is assumed) to select the target
domain.
The value for this header is provided in all responses.
X-Syncope-Key and Location
When creating an entity (User, Group, Schema, External Resource, …) these two headers are populated respectively with the entity key (which may be auto-generated) and the absolute URI identifying the new REST resource.
X-Application-Error-Code and X-Application-Error-Info
If the requested operation is in error, X-Application-Error-Code will contain the error code (mostly from
ClientExceptionType)
and X-Application-Error-Info might be optionally populated with more details, if available.
X-Syncope-Delegated-By
When requesting an operation under Delegation, this header must be provided to indicate the delegating User, either by their username or key.
X-Syncope-Null-Priority-Async
When set to true, this request header instructs the propagation process not to wait for completion
when communicating with External Resources with no priority set.
Prefer and Preference-Applied
Some REST endpoints allow the clients to request certain behavior; this is done via the Prefer header.
When Prefer is specified in the request, the response will feature the Preference-Applied header, with value set
to the effective preference applied.
return-content / return-no-content
REST endpoints for creating, updating or deleting Users, Groups or Any Objects return the entity in the response payload
by default.
If this is not required, the Prefer request header can be set to return-no-content (return-content will instead
keep the default behavior).
Use Prefer: return-no-content in scenarios where it is important to avoid unnecessary data in the response payload.
|
respond-async
The Batch endpoint can be requested for asynchronous processing.
ETag, If-Match and If-None-Match
For each response containing Users, Groups or Any Objects, the ETag header is generated, which contains the latest modification date.
This value can be passed, during subsequent requests to modify the same entity, via the If-Match or
If-None-Match headers.
When the provided If-Match value does not match the latest modification date of the entity, an error is reported and
the requested operation is not performed.
The combined usage of ETag and If-Match can be enforced to implement optimistic concurrency control over Users,
Groups and Any Objects operations.
|
X-Syncope-Entitlements
When invoking the REST endpoint /users/self in GET, the X-Syncope-Entitlements response header will list all
the entitlements owned by the requesting user.
X-Syncope-Delegations
When invoking the REST endpoint /users/self in GET, the X-Syncope-Delegations response header will list all
delegating users for each Delegation for which the requesting user is delegated.
X-Syncope-Privileges
When invoking the REST endpoint /users/self in GET, the X-Syncope-Privileges response header will list all
the privileges owned by the requesting user.
4.4.3. Batch
Batch requests allow grouping multiple operations into a single HTTP request payload.
A batch request is represented as a Multipart MIME v1.0 message, a standard format
allowing the representation of multiple parts, each of which may have a different content type (currently
JSON, YAML or XML), within a single request.
Batch requests are handled by the /batch REST endpoint: via HTTP POST method to submit requests, via HTTP GET
method to fetch responses asynchronously.
| The specification and implementation of batch processing in Apache Syncope is inspired by the standards defined by OData 4.0 |
Batch requests
The batch request must contain a Content-Type header specifying a content type of multipart/mixed and a boundary
specification as defined in RFC2046.
The body of a batch request is made up of a series of individual requests, each represented as a distinct MIME part
(i.e. separated by the boundary defined in the Content-Type header).
Core will process the requests within a batch request sequentially.
An individual request must include a Content-Type header with value application/http and a
Content-Transfer-Encoding header with value binary.
--batch_61bfef8d-0a00-41aa-b775-7b6efff37652 (1)
Content-Type: application/http
Content-Transfer-Encoding: binary
^M (2)
POST /users HTTP/1.1 (3)
Accept: application/json
Content-Length: 1157
Content-Type: application/json
^M
{"@class":"org.apache.syncope.common.lib.to.UserTO","key":null,"type":"USER","realm":"/"}
--batch_61bfef8d-0a00-41aa-b775-7b6efff37652
Content-Type: application/http
Content-Transfer-Encoding: binary
^M
POST /groups HTTP/1.1 (4)
Accept: application/xml
Content-Length: 628
Content-Type: application/xml
^M
<?xml version="1.0" encoding="UTF-8" standalone="yes"?><syncope21:group xmlns:syncope21="http://syncope.apache.org/2.1">
</syncope21:group>
--batch_61bfef8d-0a00-41aa-b775-7b6efff37652
Content-Type: application/http
Content-Transfer-Encoding: binary
^M
PATCH /users/24eb15aebatch@syncope.apache.org HTTP/1.1 (5)
Accept: application/json
Content-Length: 362
Content-Type: application/json
Prefer: return-no-content
^M
{"@class":"org.apache.syncope.common.lib.patch.UserPatch","key":"24eb15aebatch@syncope.apache.org"}
--batch_61bfef8d-0a00-41aa-b775-7b6efff37652
Content-Type: application/http
Content-Transfer-Encoding: binary
^M
DELETE /groups/287ede7c-98eb-44e8-979d-8777fa077e12 HTTP/1.1 (6)
--batch_61bfef8d-0a00-41aa-b775-7b6efff37652--
| 1 | message boundary |
| 2 | represents CR LF |
| 3 | user create, with JSON payload (shortened) |
| 4 | group create, with XML payload (shortened) |
| 5 | user update, with JSON payload (shortened) |
| 6 | group delete |
Batch responses
Requests within a batch are evaluated according to the same semantics used when the request appears outside the context of a batch.
The order of individual requests in a batch request is significant.
If the set of request headers of a batch request are valid (the Content-Type is set to multipart/mixed, etc.)
Core will return a 200 OK HTTP response code to indicate that the request was accepted for processing, and the
related execution results.
If Core receives a batch request with an invalid set of headers it will return a 400 Bad Request code and perform no
further processing of the request.
A response to a batch request must contain a Content-Type header with value multipart/mixed.
Structurally, a batch response body must match one-to-one with the corresponding batch request body, such that the same multipart MIME message structure defined for requests is used for responses
--batch_61bfef8d-0a00-41aa-b775-7b6efff37652 (1)
Content-Type: application/http
Content-Transfer-Encoding: binary
^M (2)
HTTP/1.1 201 Created (3)
Content-Type: application/json
Date: Thu, 09 Aug 2018 09:55:46 GMT
ETag: "1533808545975"
Location: http://localhost:9080/syncope/rest/users/d399ba84-12e3-43d0-99ba-8412e303d083
X-Syncope-Domain: Master
X-Syncope-Key: d399ba84-12e3-43d0-99ba-8412e303d083
^M
{"entity":{"@class":"org.apache.syncope.common.lib.to.UserTO"}
--batch_61bfef8d-0a00-41aa-b775-7b6efff37652
Content-Type: application/http
Content-Transfer-Encoding: binary
^M
HTTP/1.1 201 Created (4)
Content-Type: application/xml
Date: Thu, 09 Aug 2018 09:55:46 GMT
ETag: "1533808546342"
Location: http://localhost:9080/syncope/rest/groups/843b2fc3-b8a8-4a8b-bb2f-c3b8a87a8b2e
X-Syncope-Domain: Master
X-Syncope-Key: 843b2fc3-b8a8-4a8b-bb2f-c3b8a87a8b2e
^M
<?xml version="1.0" encoding="UTF-8" standalone="yes"?>
<syncope21:provisioningResult xmlns:syncope21="http://syncope.apache.org/2.1"></syncope21:provisioningResult>
--batch_61bfef8d-0a00-41aa-b775-7b6efff37652
Content-Type: application/http
Content-Transfer-Encoding: binary
^M
HTTP/1.1 204 No Content (5)
Content-Length: 0
Date: Thu, 09 Aug 2018 09:55:47 GMT
Preference-Applied: return-no-content
X-Syncope-Domain: Master
^M
--batch_61bfef8d-0a00-41aa-b775-7b6efff37652
Content-Type: application/http
Content-Transfer-Encoding: binary
^M
HTTP/1.1 200 OK (6)
Content-Type: application/json
Date: Thu, 09 Aug 2018 09:55:47 GMT
X-Syncope-Domain: Master
^M
{"entity":{"@class":"org.apache.syncope.common.lib.to.GroupTO"}
--batch_61bfef8d-0a00-41aa-b775-7b6efff37652--
| 1 | message boundary (same as request) |
| 2 | represents CR LF |
| 3 | user create response, with JSON payload (shortened) |
| 4 | group create respose, with XML payload (shortened) |
| 5 | user update, no content as Prefer: return-no-content was specified |
| 6 | group delete response, with JSON payload (shortened) |
Asynchronous Batch Processing
Batch requests may be executed asynchronously by including the respond-async preference in the
Prefer header.
Core will return an empty response, with status 202 Accepted.
Clients can poll the /batch endpoint in GET by passing the same boundary used for request: if 202 Accepted is
returned, then the request is still under processing; otherwise, 200 OK will be returned, along with the full batch
response.
Once retrieved, the batch response is not available any more from the /batch endpoint.
4.4.4. Search
It is possible to search for Users, Groups and Any Objects matching a set of given conditions expressed through FIQL.
The Feed Item Query Language (FIQL, pronounced “fickle”) is a simple but flexible, URI-friendly syntax for expressing filters across the entries in a syndicated feed.
The FIQL queries can be passed (among other parameters) to the search endpoints available, e.g.
-
GET /users?fiql=query -
GET /groups?fiql=query -
GET /anyObjects?fiql=query -
GET /resources/{resource}/{anytype}?fiql=query
where:
-
queryis an URL-encoded string representation of the given FIQL query, as in the following examples; -
resourceis one of defined external resources; -
anytypeis one of defined any types.
username==rossini
username==*ini
username=~rOsSiNi
username=~*iNi
loginDate==$null
lastLoginDate=ge=2016-03-02 15:21:22
$resources==resource-ldap
$groups==root
$groups==*child
$roles==Other
$relationshipTypes==neighborhood
$relationships==Canon MF 8030c
$type==PRINTER
username=~*iNi;(loginDate==$null,$roles==Other)
Sorting Search Results
Search results can be requested for sorting by passing the optional orderBy query parameter to the search endpoints
available, e.g.
-
GET /users?fiql=query&orderBy=sort -
GET /groups?fiql=query&orderBy=sort -
GET /anyObjects?fiql=query&orderBy=sort -
GET /resources/{resource}/{anytype}?orderBy=sort
where sort is an URL-encoded string representation of the sort request, as in the following examples.
ASC)username
username DESC
email DESC, username ASC
4.4.5. Client Library
The Java client library simplifies the interaction with the Core by hiding the underlying HTTP communication details and providing native methods and payload objects.
The library is available as a Maven artifact:
<dependency>
  <groupId>org.apache.syncope.client</groupId>
  <artifactId>syncope-client-lib</artifactId>
  <version>2.1.14</version>
</dependency>
Initialization
First you need to build an instance of SyncopeClientFactoryBean by providing the deployment base URL, as follows:
SyncopeClientFactoryBean clientFactory = new SyncopeClientFactoryBean().
              setAddress("http://localhost:9080/syncope/rest/");
You might also select a specific domain - other than Master, choose to exchange XML payloads - rather
than JSON (default), to select
HTTP compression or to set the
TLS client configuration
(more options in the
Javadoc):
TLSClientParameters tlsClientParameters = ...;
SyncopeClientFactoryBean clientFactory = new SyncopeClientFactoryBean().
              setAddress("http://localhost:9080/syncope/rest/").
              setDomain("Two").
              setContentType(SyncopeClientFactoryBean.ContentType.XML).
              setUseCompression(true).
              setTlsClientParameters(tlsClientParameters);
At this point an instance of SyncopeClient can be obtained by passing the login credentials via:
SyncopeClient client = clientFactory.create("admin", "password");Or you can combine into a single statement as:
SyncopeClient client = new SyncopeClientFactoryBean().
              setAddress("http://localhost:9080/syncope/rest/").
              create("admin", "password");
Usage
Select one of the RESTful services and invoke one of the available methods:
LoggerService loggerService = client.getService(LoggerService.class);

LoggerTO loggerTO = loggerService.read(LoggerType.LOG, "org.apache.syncope.core.connid");
loggerTO.setLevel(LoggerLevel.DEBUG);

loggerService.update(LoggerType.LOG, loggerTO);| More RESTful services could be available besides the default set, as there might be extensions installed in the given deployment; the Apache Camel Provisioning Manager provides the CamelRouteService, for instance. |
Advanced REST features are also available from SyncopeClient instances: check
the javadoc
for more information.
|
All search operations return paged result handlers which can be exploited both for getting the actual results and for extrapolating pagination coordinates.
UserService userService = client.getService(UserService.class);

int count = userService.search(new AnyQuery.Builder().page(0).size(0).build()).getTotalCount(); (1)

PagedResult<UserTO> matchingUsers = userService.search(
    new AnyQuery.Builder().realm(SyncopeConstants.ROOT_REALM).
    fiql(SyncopeClient.getUserSearchConditionBuilder().is("username").
    equalTo("ros*ini").query()).build()); (2)

PagedResult<UserTO> matchingUsers = userService.search(
    new AnyQuery.Builder().realm(SyncopeConstants.ROOT_REALM).
    fiql(SyncopeClient.getUserSearchConditionBuilder().isNull("loginDate").query()).
    build()); (3)

PagedResult<UserTO> matchingUsers = userService.search(
    new AnyQuery.Builder().realm(SyncopeConstants.ROOT_REALM).
    fiql(SyncopeClient.getUserSearchConditionBuilder().inRoles("Other").query()).
    build()); (4)

AnyObjectService anyObjectService = client.getService(AnyObjectService.class);

PagedResult<AnyObjectTO> matchingAnyObjects = anyObjectService.search(
    new AnyQuery.Builder().realm(SyncopeConstants.ROOT_REALM).
    fiql(SyncopeClient.getAnyObjectSearchConditionBuilder("PRINTER").query()).
    build()); (5)

GroupService groupService = client.getService(GroupService.class);

PagedResult<GroupTO> matchingGroups = groupService.search(
    new AnyQuery.Builder().realm("/even/two").page(3).size(150).
    fiql(SyncopeClient.getGroupSearchConditionBuilder().isAssignable().
        and("name").equalTo("palo*").query()).
build()); (6)| 1 | get the total number of users available in the given deployment (and domain) |
| 2 | get users in the root realm with username matching the provided wildcard expression |
| 3 | get users in the root realm with no values for loginDate, i.e. that have never authenticated to the
given deployment |
| 4 | get users in the root realm with role Other assigned |
| 5 | get all any objects in the root realm with type PRINTER |
| 6 | get all groups that can be assigned to users or any objects in the /even/two realm - third page of the result,
where each page contains 150 items |
BatchRequest batchRequest = client.batch(); (1)

UserService batchUserService = batchRequest.getService(UserService.class);

final int pageSize = 100;
final int count = userService.search(
        new AnyQuery.Builder().page(0).size(0).build()).getTotalCount(); (2)
for (int page = 1; page <= (count / pageSize) + 1; page++) {
    for (UserTO user : userService.search(
            new AnyQuery.Builder().page(page).size(pageSize).build()).getResult()) {  (3)

        batchUserService.delete(user.getKey()); (4)
    }
}

BatchResponse batchResponse = batchRequest.commit();  (5)
List<BatchResponseItem> batchResponseItems = batchResponse.getItems(); (6)| 1 | begin the batch request |
| 2 | get the total number of users available in the given deployment (and domain) |
| 3 | loop through all users available, using paginated search |
| 4 | add each user’s deletion to the batch request |
| 5 | send the batch request for processing |
| 6 | examine the batch results |
Triple<Map<String, Set<String>>, List<String>, UserTO> self = client.self();
UserTO userTO = self.getRight(); (1)
Map<String, Set<String>> realm2entitlements = self.getLeft(); (2)
List<String> delegations = self.getMiddle(); (3)| 1 | UserTO of the requesting user |
| 2 | for each realm, the owned entitlements |
| 3 | delegations assigned to the requesting user |
String key = ...; (1)
StatusPatch statusPatch = new StatusPatch();
statusPatch.setKey(key);
statusPatch.setType(StatusPatchType.SUSPEND); (2)
UserTO userTO = userService.status(statusPatch).
  readEntity(new GenericType<ProvisioningResult<UserTO>>() {
}).getEntity(); (3)| 1 | assume the key of the user to be suspended is known in advance |
| 2 | ACTIVATE, SUSPEND, REACTIVATE values are accepted, and honoured depending on the actual status of the user
being updated |
| 3 | request for user update and read back the updated entity |
4.5. Customization
| Only Maven projects can be customized: if using Standalone, Debian packages or the GUI installer, none of the customizations discussed below can be applied. |
Apache Syncope is designed to be as flexible as possible, to best suit the various environments in which it can be deployed. Besides other aspects, this means that every feature and component can be extended or replaced.
Once the project has been created from the provided Maven archetype, the generated source tree is available for either adding new features or replacing existing components.
In general, the Embedded Mode (see the
Apache Syncope Getting Started Guide
for details) allows the user to work comfortably from a single workstation, with no need of additional setup; it is
effectively implemented as the all
Maven profile, where the available optional
components and extensions are enabled.
When deploying the generated WAR artifacts into an external JavaEE Container however, the required components and
extensions need to be explicitly selected and enabled, as shown in the following text.
The WAR artifacts are generated by running the Maven command (with reference to the suggested directory layout):
$ mvn clean verify \ -Dconf.directory=/opt/syncope/conf \ -Dbundles.directory=/opt/syncope/bundles \ -Dlog.directory=/opt/syncope/log $ cp core/target/classes/*properties /opt/syncope/conf $ cp console/target/classes/*properties /opt/syncope/conf $ cp enduser/target/classes/*properties /opt/syncope/conf $ cp enduser/target/classes/customFormAttributes.json /opt/syncope/conf $ cp enduser/target/classes/customTemplate.json /opt/syncope/conf
After downloading all of the dependencies that are needed, three WAR files will be produced:
-
core/target/syncope.war -
console/target/syncope-console.war -
enduser/target/syncope-enduser.war
If no failures are encountered, your basic Apache Syncope project is now ready to be deployed.
|
JPDA Debug in Embedded Mode
The Java™ Platform Debugger Architecture (JPDA) is a collection of APIs aimed to help with debugging Java code. Enhancing the Now, from the At this point your favourite IDE can be attached to the port |
4.5.1. Core
When providing custom Java classes implementing the defined interfaces or extending the existing
implementations, their package must be rooted under org.apache.syncope.core, otherwise they will not be available
at runtime.
|
Besides replacing existing classes as explained above, new implementations can
be provided - in the source tree under core/src/main/java when Java or via REST services if Groovy - for the following
components:
-
propagation, push, pull and logic actions
Customize OpenJPA settings
Apache OpenJPA is at the core of the persistence layer; its configuration can be tweaked under several aspects - including caching for example, to best suit the various environments.
In case you need to alter the standard settings provided, proceed as follows.
Replace
classpath*:/coreContext.xml
classpath*:/securityContext.xml
classpath*:/logicContext.xml
classpath*:/restCXFContext.xml
classpath*:/persistenceContext.xml
classpath*:/provisioning*Context.xml
classpath*:/workflow*Context.xml
with
classpath*:/coreContext.xml classpath*:/securityContext.xml classpath*:/logicContext.xml classpath:/restCXFContext.xml classpath:/persistenceContext.xml classpath*:/provisioning*Context.xml classpath*:/workflow*Context.xml
in core/src/main/webapp/WEB-INF/web.xml.
Download
persistenceContext.xml
and save it under core/src/main/resources/.
Download
https://github.com/apache/syncope/blob/syncope-2.1.14/core/persistence-jpa/src/main/resources/domains.xml
and save it under core/src/main/resources/.
Now you can add any OpenJPA configuration property in one of domains configuration files as
core/src/main/resources/domains/MasterDomain.xml as follows, for the EntityManagerFactory bean:
<property name="jpaPropertyMap">
<map>
<entry key="openjpa.DataCache" value="true(Lru=true)"/>
<entry key="openjpa.QueryCache" value="true(Lru=true)"/>
</map>
</property>|
The OpenJPA documentation’s XML snippets refer to a different configuration style; for example, when used in
one of domains configuration files as becomes: |
Enable the Flowable User Workflow Adapter
Add the following dependency to core/pom.xml:
<dependency>
<groupId>org.apache.syncope.ext.flowable</groupId>
<artifactId>syncope-ext-flowable-rest-cxf</artifactId>
<version>${syncope.version}</version>
</dependency>Copy core/src/main/resources/all/workflow.properties to core/src/main/resources/workflow.properties.
Enable the Apache Camel Provisioning Manager
Add the following dependencies to core/pom.xml:
<dependency>
<groupId>org.apache.syncope.ext.camel</groupId>
<artifactId>syncope-ext-camel-rest-cxf</artifactId>
<version>${syncope.version}</version>
</dependency>
<dependency>
<groupId>org.apache.syncope.ext.camel</groupId>
<artifactId>syncope-ext-camel-persistence-jpa</artifactId>
<version>${syncope.version}</version>
</dependency>
<dependency>
<groupId>org.apache.syncope.ext.camel</groupId>
<artifactId>syncope-ext-camel-provisioning</artifactId>
<version>${syncope.version}</version>
</dependency>Copy core/src/main/resources/all/provisioning.properties to core/src/main/resources/provisioning.properties.
Enable the Swagger extension
Add the following dependency to core/pom.xml:
<dependency>
<groupId>org.apache.syncope.ext</groupId>
<artifactId>syncope-ext-swagger-ui</artifactId>
<version>${syncope.version}</version>
</dependency>Enable the SAML 2.0 Service Provider extension
Add the following dependencies to core/pom.xml:
<dependency>
<groupId>org.apache.syncope.ext.saml2sp</groupId>
<artifactId>syncope-ext-saml2sp-rest-cxf</artifactId>
<version>${syncope.version}</version>
</dependency>
<dependency>
<groupId>org.apache.syncope.ext.saml2sp</groupId>
<artifactId>syncope-ext-saml2sp-persistence-jpa</artifactId>
<version>${syncope.version}</version>
</dependency>Copy core/src/main/resources/all/saml2sp-logic.properties to core/src/main/resources/saml2sp-logic.properties.
Setup a keystore and place it under the configuration directory, then review
the content of core/src/main/resources/saml2sp-logic.properties accordingly.
Enable the OpenID Connect Client extension
Add the following dependencies to core/pom.xml:
<dependency>
<groupId>org.apache.syncope.ext.oidcclient</groupId>
<artifactId>syncope-ext-oidcclient-rest-cxf</artifactId>
<version>${syncope.version}</version>
</dependency>
<dependency>
<groupId>org.apache.syncope.ext.oidcclient</groupId>
<artifactId>syncope-ext-oidcclient-persistence-jpa</artifactId>
<version>${syncope.version}</version>
</dependency>Enable the Elasticsearch extension
Add the following dependencies to core/pom.xml:
<dependency>
<groupId>org.apache.syncope.ext.elasticsearch</groupId>
<artifactId>syncope-ext-elasticsearch-logic</artifactId>
<version>${syncope.version}</version>
</dependency>
<dependency>
<groupId>org.apache.syncope.ext.elasticsearch</groupId>
<artifactId>syncope-ext-elasticsearch-provisioning-java</artifactId>
<version>${syncope.version}</version>
</dependency>
<dependency>
<groupId>org.apache.syncope.ext.elasticsearch</groupId>
<artifactId>syncope-ext-elasticsearch-persistence-jpa</artifactId>
<version>${syncope.version}</version>
</dependency>Replace
default.audit.appender=org.apache.syncope.core.logic.audit.JdbcAuditAppender
with
default.audit.appender=org.apache.syncope.core.logic.audit.ElasticsearchAuditAppender
in core/src/main/resources/logic.properties.
Download
and
then save both under core/src/main/resources.
Now, adjust the parameters in core/src/main/resources/elasticsearchClientContext.xml to match your
Elasticsearch deployment.
Finally, replace the following text in core/src/main/webapp/WEB-INF/web.xml:
classpath*:/coreContext.xml
classpath*:/securityContext.xml
classpath*:/logicContext.xml
classpath*:/restCXFContext.xml
classpath*:/persistenceContext.xml
classpath*:/provisioning*Context.xml
classpath*:/workflow*Context.xml
with
classpath*:/coreContext.xml classpath:/elasticsearchClientContext.xml classpath*:/securityContext.xml classpath*:/logicContext.xml classpath*:/restCXFContext.xml classpath*:/persistenceContext.xml classpath*:/provisioning*Context.xml classpath*:/workflow*Context.xml
It is also required to initialize the Elasticsearch indexes: add a new Java implementation for
TASKJOB_DELEGATE and use org.apache.syncope.core.provisioning.java.job.ElasticsearchReindex as class.
Then, create a new custom task, select the implementation just created as job delegate and execute it.
The org.apache.syncope.core.provisioning.java.job.ElasticsearchReindex custom task created above is not meant for
scheduled execution; rather, it can be run every time you want to blank and re-create the Elasticsearch indexes
starting from Syncope’s internal storage.
|
Enable the SCIM extension
Add the following dependencies to core/pom.xml:
<dependency>
<groupId>org.apache.syncope.ext.scimv2</groupId>
<artifactId>syncope-ext-scimv2-rest-cxf</artifactId>
<version>${syncope.version}</version>
</dependency>
<dependency>
<groupId>org.apache.syncope.ext.scimv2</groupId>
<artifactId>syncope-ext-scimv2-scim-rest-cxf</artifactId>
<version>${syncope.version}</version>
</dependency>New REST endpoints
Adding a new REST endpoint involves several operations:
-
create - in an extension’s
rest-apimodule or undercommonotherwise - a Java interface with packageorg.apache.syncope.common.rest.api.serviceand proper JAX-RS annotations; check CamelRouteService for reference; -
if needed, define supporting payload objects - in an extension’s
common-libmodule or undercommonotherwise; check CamelRouteTO for reference; -
implement - in an extension’s
rest-cxfmodule or undercoreotherwise - the interface defined above in a Java class with packageorg.apache.syncope.core.rest.cxf.service; check CamelRouteServiceImpl for reference.
By following such conventions, the new REST endpoint will be automatically picked up alongside the default services.
4.5.2. Console
When providing custom Java classes implementing the defined interfaces or extending the existing
implementations, their package must be rooted under org.apache.syncope.client.console, otherwise they will not be
available at runtime.
|
Enable the Flowable User Workflow Adapter
Add the following dependency to console/pom.xml:
<dependency>
<groupId>org.apache.syncope.ext.flowable</groupId>
<artifactId>syncope-ext-flowable-client-console</artifactId>
<version>${syncope.version}</version>
</dependency>Enable the Apache Camel Provisioning Manager
Add the following dependency to console/pom.xml:
<dependency>
<groupId>org.apache.syncope.ext.camel</groupId>
<artifactId>syncope-ext-camel-client-console</artifactId>
<version>${syncope.version}</version>
</dependency>Enable the SAML 2.0 Service Provider extension
Add the following dependencies to console/pom.xml:
<dependency>
<groupId>org.apache.syncope.ext.saml2sp</groupId>
<artifactId>syncope-ext-saml2sp-client-console</artifactId>
<version>${syncope.version}</version>
</dependency>Copy console/src/main/resources/all/saml2sp-agent.properties to console/src/main/resources/saml2sp-agent.properties.
Enable the OpenID Connect Client extension
Add the following dependencies to console/pom.xml:
<dependency>
<groupId>org.apache.syncope.ext.oidcclient</groupId>
<artifactId>syncope-ext-oidcclient-client-console</artifactId>
<version>${syncope.version}</version>
</dependency>Copy console/src/main/resources/all/oidcclient-agent.properties to console/src/main/resources/oidcclient-agent.properties.
Enable the SCIM extension
Add the following dependencies to console/pom.xml:
<dependency>
<groupId>org.apache.syncope.ext.scimv2</groupId>
<artifactId>syncope-ext-scimv2-client-console</artifactId>
<version>${syncope.version}</version>
</dependency>4.5.3. Enduser
Given the nature of the Enduser Application, all the files required by the AngularJS-based frontend to run are
generated under the local project’s enduser/src/main/webapp/app/ directory and are available for full customization.
The files in use by the Apache Wicket-based backend are still subject to the general override behavior, instead.
Enable the Flowable User Workflow Adapter
Add the following dependency to enduser/pom.xml:
<dependency>
<groupId>org.apache.syncope.ext.flowable</groupId>
<artifactId>syncope-ext-flowable-client-enduser</artifactId>
<version>${syncope.version}</version>
</dependency>Enable the SAML 2.0 Service Provider extension
Add the following dependencies to enduser/pom.xml:
<dependency>
<groupId>org.apache.syncope.ext.saml2sp</groupId>
<artifactId>syncope-ext-saml2sp-client-enduser</artifactId>
<version>${syncope.version}</version>
</dependency>Copy enduser/src/main/resources/all/saml2sp-agent.properties to enduser/src/main/resources/saml2sp-agent.properties.
Enable the OpenID Connect Client extension
Add the following dependencies to enduser/pom.xml:
<dependency>
<groupId>org.apache.syncope.ext.oidcclient</groupId>
<artifactId>syncope-ext-oidcclient-client-enduser</artifactId>
<version>${syncope.version}</version>
</dependency>Copy enduser/src/main/resources/all/oidcclient-agent.properties to enduser/src/main/resources/oidcclient-agent.properties.
i18n
The Enduser Application comes with a native internationalization mechanism.
Under the enduser/src/main/webapp/app/languages/ directory, a sub-directory for each supported language is available;
each language sub-directory contains two JSON files:
-
static.jsonfor application messages; -
dynamic.jsonfor labels (including attributes).
Changing the content of these files will result in updating the Enduser messages accordingly.
|
In order to add support for a new language (taking French as reference):
in
as
|
Form customization
The Enduser Application allows to customize the form in order to:
-
hide / show attributes
-
set attributes read-only for users
-
provide default value(s)
Under the enduser/src/main/resources directory, the customFormAttributes.json file is available, allowing to configure form
customization.
|
Hot deploy
The |
The customFormAttributes.json default content is just an empty object {}: if such file is missing, empty or not valid,
form customization will be simply disabled and all attributes will be shown.
|
{
"PLAIN":
{
"attributes": {
"firstname": {
"readonly": true,
"defaultValues": ["defaultFirstname1", "defaultFirstname2"]
},
"surname": {
"readonly": false,
"defaultValues": []
},
"fullname": {
"readonly": false
},
"email": {
"readonly": false,
"defaultValues": ["test@apache.org"]
},
"userId": {
"readonly": false
},
"cool": {
"readonly": true,
"defaultValues": ["true"]
},
"additional#loginDate": {
"readonly": false
},
"additional#cool": {
"readonly": false,
"defaultValues": ["true"]
}
}
},
"VIRTUAL":
{
"attributes": {
"virtualdata": {
"readonly": true,
"defaultValues": ["defaultVirtualData"]
}
}
}
}The customFormAttributes.json file has two main levels:
-
Schema type, e.g.
PLAIN,DERIVED,VIRTUAL; -
Attributes: list of attributes (by schema type) to be shown on the form.
Schema type
The schema type level allows to define customization of the three sub-forms available in the Enduser Application’s form.
Only one, two or all three sections can be specified, in order to customize only what is really needed.
Attributes
The attributes level contains a map of attributes to show.
Each attribute has:
-
a name, e.g. the name of the Schema from which the attribute is generated
-
a body, that specifies if the attribute should be readonly, and possibly its default values
"firstname": {
"readonly": true,
"defaultValues": ["defaultFirstname1", "defaultFirstname2"]
},Here, firstname is readonly and has two default values defaultFirstname1 and defaultFirstname2.
|
An empty shows all If all attributes are to be hidden, please use Dynamic Templating to hide the full wizard step, instead. |
|
|
Dynamic Templating
It is possible to customize the Enduser Application using the "Dynamic Templating" feature. It is a simple and fast way to customize structure and style of the whole Enduser.
Under the enduser/src/main/resources directory, the customTemplate.json file is available, allowing to configure application
style and structure.
|
Hot deploy
The |
|
The if such file is missing, empty or not valid, Enduser structure will not be valid and won’t work as expected. |
Editing default template
As sample, Syncope provides a configuration to apply a dark theme to Enduser and edit the "User Edit / Create Wizard" to only display 3 steps, like:
-
PlainSchemas;
-
Details (Username, Password, Security question etc…);
-
Finish.
The configurations for that sample are in
customTemplate.json.
In order to apply them, that content must be copied to your customTemplate.json file.
Template styling assets
In case you need, place your static .css resources somewhere (e.g. enduser/src/main/resources/META-INF/resources/app/css/templates/)
and refer them in customTemplate.json file.
Wizard steps
It is also possible to customize the list of wizard steps to be shown in "User Edit / Create Wizard". E.g., only 3 steps are displayed in the dark theme template sample configuration:
"wizard":
{
"steps": {
"plainSchemas": {
"url": "/plainSchemas"
},
"credentials": {
"url": "/credentials"
},
"finish": {
"url": "/finish"
}
}
}Use the "firstStep" property to decide which step must be set as first one in the wizard:
"wizard":
{
"firstStep": "plainSchemas",
}Template structure
The structure of the template sections is defined by templateUrl property, for each main section:
"templates":
{
"login":
{
"templateUrl": "views/templates/selfTemplate.html",
},
"edit_user":
{
"templateUrl": "views/templates/onlyPlainAttrsDetails/editUserTemplate.html",
},
"password_reset":
{
"templateUrl": "views/templates/passwordresetTemplate.html",
},
"must_change_password":
{
"templateUrl": "views/templates/mustChangePasswordTemplate.html",
},
"confirm_password_reset":
{
"templateUrl": "views/templates/confirmPasswordResetTemplate.html",
}
},E.g., enduser/src/main/resources/META-INF/resources/app/views/templates/onlyPlainAttrsDetails/editUserTemplate.html is
equals to the default
enduser/src/main/resources/META-INF/resources/app/views/templates/editUserTemplate.html
template file.
Anyway, it is just helpful to show that it is possible to customize all the application structure in a very simple way.
It could also be useful to edit the specific parts of a single wizard step or view; all of those are placed in
enduser/src/main/resources/META-INF/resources/app/views/ folder.
Please do not change the main object keys in customTemplate.json file (e.g. templates, edit_user, login, generalAssets, etc…);
they are used to identify the specific customizable template parts of the Enduser application.
In case it is necessary to change those identifiers, remember to edit all references in other parts of the application.
|
4.5.4. Extensions
Extensions can be part of a local project, to encapsulate special features which are specific to a given deployment.
For example, the CHOReVOLUTION IdM - based on Apache Syncope - provides an extension for managing via the Core and visualizing via the Admin UI the running choreography instances.
4.6. System Administration
4.6.1. DBMS
| The changes reported below to support different DBMSes are not complete files, but only show the lines that need to be updated. |
PostgreSQL
| Apache Syncope 2.1.14 is verified with PostgreSQL server >= 12 and JDBC driver >= 42.5.1. |
In provisioning.properties, replace as follows:
quartz.jobstore=org.quartz.impl.jdbcjobstore.PostgreSQLDelegate quartz.sql=tables_postgres.sql
In domains/Master.properties (for the Master domain), replace as follows:
Master.driverClassName=org.postgresql.Driver Master.url=jdbc:postgresql://localhost:5432/syncope Master.schema= Master.username=syncope Master.password=syncope Master.databasePlatform=org.apache.openjpa.jdbc.sql.PostgresDictionary Master.orm=META-INF/spring-orm.xml
This assumes that you have a PostgreSQL instance running on localhost, listening on its default port 5432 with a
database syncope fully accessible by user syncope with password syncope.
|
Download
views.xml
and save it under core/src/main/resources/.
PostgreSQL (JSONB)
| With the configurations reported below, Apache Syncope will leverage the JSONB column type for attribute storage. |
| Apache Syncope 2.1.14 is verified with PostgreSQL server >= 12 and JDBC driver >= 42.5.1. |
Add the following dependency to core/pom.xml:
<dependency>
<groupId>org.apache.syncope.core</groupId>
<artifactId>syncope-core-persistence-jpa-json</artifactId>
<version>${syncope.version}</version>
</dependency>In persistence.properties, replace as follows:
entity.factory=org.apache.syncope.core.persistence.jpa.entity.PGJPAJSONEntityFactory plainSchema.dao=org.apache.syncope.core.persistence.jpa.dao.PGJPAJSONPlainSchemaDAO plainAttr.dao=org.apache.syncope.core.persistence.jpa.dao.JPAJSONPlainAttrDAO plainAttrValue.dao=org.apache.syncope.core.persistence.jpa.dao.JPAJSONPlainAttrValueDAO any.search.dao=org.apache.syncope.core.persistence.jpa.dao.PGJPAJSONAnySearchDAO any.search.visitor=org.apache.syncope.core.persistence.api.search.SearchCondVisitor user.dao=org.apache.syncope.core.persistence.jpa.dao.JPAJSONUserDAO group.dao=org.apache.syncope.core.persistence.jpa.dao.JPAJSONGroupDAO anyObject.dao=org.apache.syncope.core.persistence.jpa.dao.JPAJSONAnyObjectDAO conf.dao=org.apache.syncope.core.persistence.jpa.dao.JPAJSONConfDAO logger.dao=org.apache.syncope.core.persistence.jpa.dao.PGJPAJSONLoggerDAO
In provisioning.properties, replace as follows:
quartz.jobstore=org.quartz.impl.jdbcjobstore.PostgreSQLDelegate quartz.sql=tables_postgres.sql
In domains/Master.properties (for the Master domain), replace as follows:
Master.driverClassName=org.postgresql.Driver Master.url=jdbc:postgresql://localhost:5432/syncope?stringtype=unspecified Master.schema= Master.username=syncope Master.password=syncope Master.databasePlatform=org.apache.openjpa.jdbc.sql.PostgresDictionary Master.orm=META-INF/spring-orm-pgjsonb.xml Master.audit.sql=audit_pgjsonb.sql
This assumes that you have a PostgreSQL instance running on localhost, listening on its default port 5432 with a
database syncope fully accessible by user syncope with password syncope.
|
Download
MasterContent.xml
and save it under core/src/main/resources/domains/.
Download
indexes.xml
and
views.xml
then save both under core/src/main/resources/.
Download
MasterContent.xml
and save it under core/src/test/resources/domains/.
MySQL
| Apache Syncope 2.1.14 is verified with MySQL server >= 8.0 and JDBC driver >= 8.0.28. |
In provisioning.properties, replace as follows:
quartz.jobstore=org.quartz.impl.jdbcjobstore.StdJDBCDelegate quartz.sql=tables_mysql_innodb.sql
This assumes that the InnoDB engine is enabled in your MySQL instance - if this is not the case, then change the value
for quartz.sql to tables_mysql.sql.
|
In domains/Master.properties (for the Master domain), replace as follows:
Master.driverClassName=com.mysql.cj.jdbc.Driver Master.url=jdbc:mysql://localhost:3306/syncope?useSSL=false&allowPublicKeyRetrieval=true&characterEncoding=UTF-8 Master.schema= Master.username=syncope Master.password=syncope Master.databasePlatform=org.apache.openjpa.jdbc.sql.MySQLDictionary(blobTypeName=LONGBLOB,dateFractionDigits=3) Master.orm=META-INF/spring-orm.xml Master.audit.sql=audit_mysql_innodb.sql
It is important to set the collation to utf8_general_ci after creation of syncope database.
|
This assumes that the InnoDB engine is enabled in your MySQL instance - if this is not the case, then change the value
for Master.audit to audit.sql.
|
This assumes that you have a MySQL instance running on localhost, listening on its default port 3306 with a database
syncope fully accessible by user syncope with password syncope.
|
MySQL (JSON)
| With the configurations reported below, Apache Syncope will leverage the JSON_TABLE function. |
| Apache Syncope 2.1.14 is verified with MySQL server >= 8.0 and JDBC driver >= 8.0.28. |
Add the following dependency to core/pom.xml:
<dependency>
<groupId>org.apache.syncope.core</groupId>
<artifactId>syncope-core-persistence-jpa-json</artifactId>
<version>${syncope.version}</version>
</dependency>In persistence.properties, replace as follows:
entity.factory=org.apache.syncope.core.persistence.jpa.entity.MyJPAJSONEntityFactory plainSchema.dao=org.apache.syncope.core.persistence.jpa.dao.MyJPAJSONPlainSchemaDAO plainAttr.dao=org.apache.syncope.core.persistence.jpa.dao.JPAJSONPlainAttrDAO plainAttrValue.dao=org.apache.syncope.core.persistence.jpa.dao.JPAJSONPlainAttrValueDAO any.search.dao=org.apache.syncope.core.persistence.jpa.dao.MyJPAJSONAnySearchDAO any.search.visitor=org.apache.syncope.core.persistence.api.search.SearchCondVisitor user.dao=org.apache.syncope.core.persistence.jpa.dao.JPAJSONUserDAO group.dao=org.apache.syncope.core.persistence.jpa.dao.JPAJSONGroupDAO anyObject.dao=org.apache.syncope.core.persistence.jpa.dao.JPAJSONAnyObjectDAO conf.dao=org.apache.syncope.core.persistence.jpa.dao.JPAJSONConfDAO logger.dao=org.apache.syncope.core.persistence.jpa.dao.MyJPAJSONLoggerDAO
In provisioning.properties, replace as follows:
quartz.jobstore=org.quartz.impl.jdbcjobstore.StdJDBCDelegate quartz.sql=tables_mysql_innodb.sql
| This assumes that the InnoDB engine is enabled in your MySQL instance. |
In domains/Master.properties (for the Master domain), replace as follows:
Master.driverClassName=com.mysql.cj.jdbc.Driver Master.url=jdbc:mysql://localhost:3306/syncope?useSSL=false&allowPublicKeyRetrieval=true&characterEncoding=UTF-8 Master.schema= Master.username=syncope Master.password=syncope Master.databasePlatform=org.apache.openjpa.jdbc.sql.MySQLDictionary(blobTypeName=LONGBLOB,dateFractionDigits=3) Master.orm=META-INF/spring-orm-myjson.xml Master.audit.sql=audit_myjson.sql
It is important to set the collation to utf8_general_ci after creation of syncope database.
|
This assumes that you have a MySQL instance running on localhost, listening on its default port 3306 with a database
syncope fully accessible by user syncope with password syncope.
|
Download
MasterContent.xml
and save it under core/src/main/resources/domains/.
Download
indexes.xml
and
views.xml
then save both under core/src/main/resources/.
Download
MasterContent.xml
and save it under core/src/test/resources/domains/.
MariaDB
| Apache Syncope 2.1.14 is verified with MariaDB server >= 10 and JDBC driver >= 3.0.8. |
In provisioning.properties, replace as follows:
quartz.jobstore=org.quartz.impl.jdbcjobstore.StdJDBCDelegate quartz.sql=tables_mariadb.sql
This assumes that the InnoDB engine is enabled in your MariaDB instance - if this is not the case, then change the value
for quartz.sql to tables_mariadb.sql.
|
In domains/Master.properties (for the Master domain), replace as follows:
Master.driverClassName=org.mariadb.jdbc.Driver Master.url=jdbc:mariadb://localhost:3306/syncope?characterEncoding=UTF-8 Master.schema= Master.username=syncope Master.password=syncope Master.databasePlatform=org.apache.openjpa.jdbc.sql.MariaDBDictionary(blobTypeName=LONGBLOB,dateFractionDigits=3) Master.orm=META-INF/spring-orm.xml Master.audit.sql=audit_mariadb.sql
It is important to set the collation to utf8_general_ci after creation of syncope database.
|
This assumes that you have a MariaDB instance running on localhost, listening on its default port 3306 with a database
syncope fully accessible by user syncope with password syncope.
|
Oracle Database
| Apache Syncope 2.1.14 is verified with Oracle database >= 11g and JDBC driver >= ojdbc8 12.2.0.1. |
In provisioning.properties, replace as follows:
quartz.jobstore=org.quartz.impl.jdbcjobstore.oracle.OracleDelegate quartz.sql=tables_oracle.sql
In domains/Master.properties (for the Master domain), replace as follows:
Master.driverClassName=oracle.jdbc.OracleDriver Master.url=jdbc:oracle:thin:@localhost:1521:orcl Master.schema=SYNCOPE Master.username=syncope Master.password=syncope Master.databasePlatform=org.apache.openjpa.jdbc.sql.OracleDictionary Master.orm=META-INF/spring-orm-oracle.xml Master.audit.sql=audit_oracle.sql
This assumes that you have an Oracle instance running on localhost, listening on its default port 1521 with a database
syncope under tablespace SYNCOPE, fully accessible by user syncope with password syncope.
|
MS SQL Server
| Apache Syncope 2.1.14 is verified with MS SQL server >= 2017 and JDBC driver >= 11.2.1.jre8. |
In provisioning.properties, replace as follows:
quartz.jobstore=org.quartz.impl.jdbcjobstore.MSSQLDelegate quartz.sql=tables_sqlServer.sql
In domains/Master.properties (for the Master domain), replace as follows:
Master.driverClassName=com.microsoft.sqlserver.jdbc.SQLServerDriver Master.url=jdbc:sqlserver://localhost:1344;database=syncope;selectMethod=cursor;sendStringParametersAsUnicode=false Master.schema=dbo Master.username=syncope Master.password=syncope Master.databasePlatform=org.apache.openjpa.jdbc.sql.SQLServerDictionary Master.orm=META-INF/spring-orm-sqlserver.xml Master.audit.sql=audit_sqlserver.sql
This assumes that you have a MS SQL Server instance running on localhost, listening on its default port 1344 with a
database syncope fully accessible by user syncope with password syncope.
|
Download
views.xml
and save it under core/src/main/resources/.
4.6.2. Database Connection Pool
The internal storage is the central place where all data of a given Core deployment are located.
After choosing the appropriate DBMS, it is of fundamental importance to provide an adequate configuration for the related database connection pool.
The database connection pool can be:
-
Application-managed (default); based on HikariCP, the related parameters can be tuned in the related domain configuration file, e.g.
domains/Master.properties, for the Master domain. -
JavaEE Container-managed, via the JNDI resource matching the name specified for a given domain, e.g.
java:comp/env/jdbc/syncopeMasterDataSourcefor the Master domain.
Each JavaEE Container provides its own way to accomplish this task:
4.6.3. JavaEE Container
Apache Tomcat 9
On GNU / Linux - Mac OS X, create $CATALINA_HOME/bin/setenv.sh with similar content
(keep everything on a single line):
JAVA_OPTS="-Djava.awt.headless=true -Dfile.encoding=UTF-8 -server \ -Xms1536m -Xmx1536m -XX:NewSize=256m -XX:MaxNewSize=256m -XX:+DisableExplicitGC \ -Djava.security.egd=file:/dev/./urandom"
On MS Windows, create %CATALINA_HOME%\bin\setenv.bat with similar content (keep everything on a single line):
set JAVA_OPTS=-Djava.awt.headless=true -Dfile.encoding=UTF-8 -server -Xms1536m -Xmx1536m -XX:NewSize=256m -XX:MaxNewSize=256m -XX:+DisableExplicitGC
It is recommended to define a separate datasource for each domain (the following example is for the Master
domain and MySQL): please also check that the connection parameters are the same as configured for DBMS:
<Resource name="jdbc/syncopeMasterDataSource" auth="Container" type="javax.sql.DataSource"
factory="org.apache.tomcat.jdbc.pool.DataSourceFactory" testWhileIdle="true"
testOnBorrow="true" testOnReturn="true"
validationQuery="SELECT 1" validationInterval="30000"
maxActive="100" minIdle="2" maxWait="10000" initialSize="2"
removeAbandonedTimeout="20" removeAbandoned="true" logAbandoned="true"
suspectTimeout="20" timeBetweenEvictionRunsMillis="5000"
minEvictableIdleTimeMillis="5000" defaultAutoCommit="false"
jdbcInterceptors="org.apache.tomcat.jdbc.pool.interceptor.ConnectionState;
org.apache.tomcat.jdbc.pool.interceptor.StatementFinalizer"
username="syncope" password="syncope" driverClassName="com.mysql.cj.jdbc.Driver"
url="jdbc:mysql://localhost:3306/syncope?characterEncoding=UTF-8"/>
Be sure to put the corresponding JDBC driver JAR file under $CATALINA_HOME/lib for each datasource defined.
|
Payara Server 5
Replace
<dependency>
<groupId>org.apache.syncope.core</groupId>
<artifactId>syncope-core-persistence-jpa</artifactId>
</dependency>with
<dependency>
<groupId>org.apache.syncope.core</groupId>
<artifactId>syncope-core-persistence-jpa</artifactId>
<exclusions>
<exclusion>
<groupId>org.apache.bval</groupId>
<artifactId>bval-jsr</artifactId>
</exclusion>
</exclusions>
</dependency>in core/pom.xml.
When using a datasource for internal storage, be sure to add
<resource-ref>
<res-ref-name>jdbc/syncopeMasterDataSource</res-ref-name>
<jndi-name>jdbc/syncopeMasterDataSource</jndi-name>
</resource-ref>right after </context-root> in core/src/main/webapp/WEB-INF/glassfish-web.xml, assuming that your Payara Server
instance provides a datasource named jdbc/syncopeMasterDataSource.
|
For better performance under GNU / Linux, do not forget to include -Djava.security.egd=file:/dev/./urandom among JVM options. |
Wildfly 14
Add
<dependency>
<groupId>javax.xml.ws</groupId>
<artifactId>jaxws-api</artifactId>
<version>2.3.1</version>
</dependency>
<dependency>
<groupId>org.apache.cxf</groupId>
<artifactId>cxf-core</artifactId>
<version>${cxf.version}</version>
</dependency>
<dependency>
<groupId>org.apache.cxf</groupId>
<artifactId>cxf-rt-transports-http</artifactId>
<version>${cxf.version}</version>
</dependency>
<dependency>
<groupId>org.apache.cxf</groupId>
<artifactId>cxf-rt-ws-policy</artifactId>
<version>${cxf.version}</version>
</dependency>
<dependency>
<groupId>org.apache.cxf</groupId>
<artifactId>cxf-rt-wsdl</artifactId>
<version>${cxf.version}</version>
</dependency>as additional dependencies in core/pom.xml, console/pom.xml and enduser/pom.xml.
Replace
classpath*:/coreContext.xml classpath*:/securityContext.xml classpath*:/logicContext.xml classpath*:/restCXFContext.xml classpath*:/persistenceContext.xml classpath*:/provisioning*Context.xml classpath*:/workflow*Context.xml
with
classpath*:/coreContext.xml
classpath*:/securityContext.xml
classpath*:/logicContext.xml
classpath:/restCXFContext.xml
classpath:/persistenceContext.xml
classpath*:/provisioning*Context.xml
classpath*:/workflow*Context.xml
in core/src/main/webapp/WEB-INF/web.xml.
Download
restCXFContext.xml
and save it under core/src/main/resources/.
Download
persistenceContext.xml
and save it under core/src/main/resources/.
Download
domains.xml
and save it under core/src/main/resources/.
Finally, add
<property name="jpaPropertyMap">
  <map>
    <entry key="openjpa.MetaDataFactory"
           value="jpa(URLs=vfs:/content/${project.build.finalName}.war/WEB-INF/lib/syncope-core-persistence-jpa-${syncope.version}.jar, Resources=${Master.orm})"/>
  </map>
</property>
in core/src/main/resources/domains/MasterDomain.xml for the MasterEntityManagerFactory bean.
|
For better performance under GNU / Linux, do not forget to include -Djava.security.egd=file:/dev/./urandom among JVM options. |
4.6.4. High-Availability
OpenJPA
When deploying multiple Syncope Core instances with a single database or database cluster, it is of
fundamental importance that the contained OpenJPA instances are correctly configured for
remote event notification.
Such configuration, in fact, allows the OpenJPA data cache to remain synchronized when deployed in multiple JVMs, thus
enforcing data consistency across all Syncope Core instances.
The default configuration in persistence.properties is
openjpa.RemoteCommitProvider=sjvmwhich is suited for single JVM installations; with multiple instances, more options like as TCP or JMS are available; see the OpenJPA documentation for reference.
|
The OpenJPA documentation's XML
snippets refer to a different configuration style; for example, when used in becomes: |
Quartz
The Quartz scheduler is largely used within Syncope Core to schedule the execution of jobs, including pull, push, notification and custom tasks, and reportlets.
By default, Quartz is configured for clustering, where each node is automatically handled via the underlying JDBC store, and all cluster nodes are equally selectable for processing jobs.
There are deployment scenarios which might have different requirements: for example, there could be three Core nodes configured with OpenJPA remote commit provider (see above), where two of them are dedicated to serve REST requests, leaving the third for running Quartz jobs.
In such cases, it is possible to prevent Quartz from running on a given node by setting the following parameter in
core/src/main/resources/provisioning.properties:
quartz.disableInstance=true
4.6.5. Domains Management
Domains are defined by three files in the configuration directory; assuming
that the domain name is Two, such files are:
-
domains/TwoDomain.xml- general configuration; -
domains/Two.properties- for DBMS parameters; -
domains/TwoContent.xml- for content initialization.
When adding a new domain to an existing deployment it is possible to copy, rename and edit the files available for
the Master domain, which is always present.
| Adding a new domain requires re-deploying the Core application and restarting the Java EE container. |
Once a new domain is added, the admin credentials for such domain can be set via the admin console, CLI or barely invoking the REST layer through curl.
The JSON payload below, when sent via POST to the /domains endpoint, will create a new newDomain domain, and set
the admin password to newPassword, to be stored via SHA cipher.
{
  "key": "newDomain",
  "adminPwd": "newPassword",
  "adminCipherAlgorithm": "SHA"
}
4.6.6. Set admin credentials
The credentials are defined in the security.properties file; text encoding must be set to UTF-8:
-
adminUser- administrator username (defaultadmin) -
adminPassword- administrator password (defaultpassword)'s hashed value -
adminPasswordAlgorithm- algorithm to be used for hash evaluation (defaultSSHA256, also supported areSHA1,SHA256,SHA512,SMD5,SSHA1,SSHA512andBCRYPT)
The sha1sum command-line tool of GNU Core Utilities can be used as follows:
echo -n "new_password" | sha1sumPlease beware that any shell special character must be properly escaped for the command above to produce the expected hashed value.
$ python3 pySSHA/ssha.py -p password -enc sha256 -s 666ac543 \
 | sed 's/{.*}//' | xargs echo -n | base64 -d | xxd -p | tr -d $'\n' | xargs echo
Several tools involved here:
The command above will:
-
generate a
SHA256hash for input valuepasswordwith suffixed salt666ac543(4 bytes in hex format), viassha.py -
remove the
{SSHA256}prefix from the generated value and newline, viasedandxargs -
since the generated value is Base64-encoded while Syncope requires Hexadecimal format, perform the required conversion via
base64,xxdandtr -
append newline to ease copy / paste, via
xargsandecho
4.6.7. Configure ConnId locations
Apache Syncope can be configured to use either local or remote connector bundles:
-
local connector bundles are located somewhere in the same filesystem where the Java EE container running Apache Syncope is deployed;
-
remote connector bundles are provided via Java or .NET connector server.
While local connector bundles feature an easy setup, remote connector bundles allow enhanced deployment scenarios and are particularly useful when it is needed to deal with architectural security constraints or when a connector bundle requires to run on a specific platform OS (say MS Windows) while Apache Syncope is deployed on another platform OS (say GNU/Linux).
The connid.properties file holds the configuration for defining which ConnId locations (either local or remote)
will be considered.
The format is quite straightforward:
connid.locations=location1,\
location2,\
...
locationN
where each location is the string representation of an URI of the form file:/path/to/directory/ for local locations,
connid://key@host:port for remote non-SSL connector servers or finally connids://key@host:port[?trustAllcerts=true]
for remote SSL connector servers, with optional flag to disable certificate check.
connid.locations=file:/opt/syncope/bundles/
connid.locations=connid://sampleKey@windows2008:4554
connid.locations=file:/opt/syncope/bundles/,\
file:/var/tmp/bundles/,\
connid://sampleKey@windows2008:4554,\
connids://anotherKey@windows2008:4559,\
connids://aThirdKey@linuxbox:9001?trustAllCerts=true
4.6.8. Deal with internal storage export - import
Almost every configurable aspect of a given deployment is contained in the internal storage: schemas, connectors, resources, mapping, roles, groups, tasks and other parameters.
During the implementation phase of an Apache Syncope-based project, it might be useful to move such configuration back
and forth from one Apache Syncope instance to another (say developer’s laptop and production server).
One option is clearly to act at a low level by empowering DBMS' dump & restore capabilities, but what if the developer is
running MySQL (or even in-memory H2) while the sysadmin features Oracle?
|
Wipe existing content
When not running in-memory H2, the internal storage’s content must be wiped before starting Apache Syncope, otherwise the provided content will be just ignored. Check Empty database found, loading default content If the internal storage is not empty, instead, you will get Data found in the database, leaving untouched |
|
All references in the following are set to |
|
MySQL and lower case table names
On some platforms (namely, Mac OS X) MySQL is configured by default to be case insensitive: in such cases, you might
want to edit the lower_case_table_names=1 |
Export
This task can be accomplished either via the admin console, CLI or by barely invoking the REST layer through curl, for example:
curl -X GET -u admin:password -o MasterContent.xml \
  http://localhost:9080/syncope/rest/configurations/stream
Import
Basically, all you need to do is to replace the local MasterContent.xml with the one exported as explained above; this
file is located at:
-
$TOMCAT_HOME/webapps/syncope/WEB-INF/classes/domains/MasterContent.xmlfor Standalone -
/usr/share/tomcat8/webapps/syncope/WEB-INF/classes/domains/MasterContent.xmlfor Debian packages -
core/src/test/resources/domains/MasterContent.xmlfor Maven projects in embedded mode -
core/src/main/resources/domains/MasterContent.xmlfor Maven projects
4.6.9. Install connector bundles
Connector bundles are made available as JAR files and can be configured, for a given deployment:
-
for Maven project, in local sources;
-
for all distributions, at run-time.
Local sources
Different version of predefined connector bundle
First of all, verify which connector bundles are predefined in your project by looking at your project’s parent POM.
As you can see, there are several Maven properties on the form connid.*.version, controlling the related connector
bundle’s version.
If you want your own project to use a different version of a given connector bundle, all you need to do is to override the related property in your own project’s root pom.xml.
Hence, supposing that you would like to use net.tirasa.connid.bundles.db.table version 2.2.5-SNAPSHOT rather than
2.2.4 shipped with Apache Syncope, add the following property to your own project’s root pom.xml:
<properties>
   ...
   <connid.database.version>2.2.5-SNAPSHOT</connid.database.version>
</properties>
Non-predefined connector bundle
If the needed connector bundle is not in the predefined set as shown above, you will need to add a new property into
your own project’s root pom.xml:
<properties>
   ...
   <my.new.connector.version>1.0.0</my.new.connector.version>
</properties>
then change the maven-dependency-plugin configuration both in core/pom.xml and console/pom.xml from
<plugin>
  <groupId>org.apache.maven.plugins</groupId>
  <artifactId>maven-dependency-plugin</artifactId>
  <inherited>true</inherited>
  <executions>
    <execution>
      <id>set-bundles</id>
      <phase>process-test-resources</phase>
      <goals>
        <goal>copy</goal>
      </goals>
    </execution>
  </executions>
</plugin>
to
<plugin>
  <groupId>org.apache.maven.plugins</groupId>
  <artifactId>maven-dependency-plugin</artifactId>
  <inherited>true</inherited>
  <configuration>
    <artifactItems>
      <artifactItem>
        <groupId>my.new.connector.groupId</groupId>
        <artifactId>my.new.connector.artifactId</artifactId>
        <version>${my.new.connector.version}</version>
        <classifier>bundle</classifier>
      </artifactItem>
    </artifactItems>
  </configuration>
  <executions>
    <execution>
      <id>set-bundles</id>
      <phase>process-test-resources</phase>
      <goals>
        <goal>copy</goal>
      </goals>
    </execution>
  </executions>
</plugin>
Run-time
Connector bundles can be added or replaced at run-time by performing the following steps:
-
Download the required connector bundle JAR file;
-
Copy the downloaded JAR file into one of configured ConnId locations, typically the
bundlesdirectory where the other connector bundles are already available.
4.6.10. E-mail Configuration
The mail.properties file holds the configuration options to enable the effective delivery of
notification e-mails:
-
smtpHost- the mail server host, typically an SMTP host; -
smtpPort- the mail server port; -
smtpUser- (optional) the username for the account at the mail host; -
smtpPassword- (optional) the password for the account at the mail host; -
smtpProtocol- the message transport protocol:smtp(default) andsmtpsare supported; -
smtpEncoding- the default encoding to use for MIME messages; -
mail.smtp.starttls.enable- whentrue, enable the use of theSTARTTLScommand to switch the connection to a TLS-protected connection before issuing any login commands; -
mail.smtp.connectiontimeout- the connection timeout value in milliseconds, to the mail host; -
mail.debug- whentrue, enable the debugging of email processing including the handshake, authentication, delivery and disconnection; in order for this setting to be effective, it is also required to add the following elements to thelog4j2.xmlconfiguration file:<asyncLogger name="org.apache.syncope.core.provisioning.java.job.notification" additivity="false" level="DEBUG"> <appender-ref ref="mainFile"/> <appender-ref ref="main"/> </asyncLogger> <asyncLogger name="javax.mail" additivity="false" level="DEBUG"> <appender-ref ref="mainFile"/> <appender-ref ref="main"/> </asyncLogger>
All the JavaMail™ properties are available for usage.
conf.directory=${conf.directory}

smtpHost=your.local.smtp.server
smtpPort=25
smtpUser=
smtpPassword=
smtpProtocol=smtp
smtpEncoding=UTF-8
mail.debug=false
mail.smtp.connectiontimeout=3000
mail.smtp.starttls.enable=false
conf.directory=${conf.directory}

smtpHost=smtp.gmail.com
smtpPort=587
smtpUser=your_username@gmail.com
smtpPassword=your_password
smtpProtocol=smtp
smtpEncoding=UTF-8
mail.debug=false
mail.smtp.connectiontimeout=3000
mail.smtp.starttls.enable=true
In order to make the changes to mail.properties effective, the Java EE container needs to be restarted.
|
Be sure to provide a sensible value for the notificationjob.cronExpression configuration parameter, otherwise
the notification tasks will not be triggered; see below for
details.
|
4.6.11. Keystore
A Java Keystore is a container for authorization certificates or public key certificates, and is often used by Java-based applications for encryption, authentication, and serving over HTTPS. Its entries are protected by a keystore password. A keystore entry is identified by an alias, and it consists of keys and certificates that form a trust chain.
A keystore is currently required by the SAML 2.0 Service Provider extension in order to sign and / or encrypt the generated SAML 2.0 requests.
While a sample keystore is provided, it is strongly recommended to setup a production keystore; in the following, a reference procedure for this is reported.
The procedure below is not meant to cover all possible options and scenarios for generating a keystore, nor to provide
complete coverage of the keytool command.
|
Create new keystore
keytool -genkey \
  -keyalg RSA \
  -keysize 2048 \
  -alias saml2sp \
  -dname "CN=SAML2SP,OU=Apache Syncope, O=The ASF, L=Wilmington, ST=Delaware, C=US" \
  -keypass akyepass \
  -storepass astorepass \
  -storetype JKS \
  -keystore saml2sp.jks
This command will create a keystore file with name saml2sp.jks in the execution directory, containing a new 2048-bit
RSA key pair, under the specified alias (saml2sp); password values for keypass and storepass are also set.
Create new CSR
keytool -certreq \
  -alias saml2sp \
  -keyalg RSA \
  -file certreq.pem \
  -keypass akyepass \
  -storepass astorepass \
  -storetype JKS \
  -keystore saml2sp.jks
This command will create a CSR file with name certreq.pem in the execution directory, within the keystore generated
above.
The generated CSR file can be sent to a Certificate Authority (CA) to request the issuance of a CA-signed certificate.
Have the CSR signed by a Certificate Authority (CA)
This step cannot be automated, and is definitely out of the scope of the this document.
Before proceeding, it is fundamental to have ready the root / intermediate CA certificate(s) and the signed certificate.
Import the certificates into the keystore
keytool -import \
  -alias root \
  -file cacert.pem \
  -keypass akyepass \
  -storepass astorepass \
  -storetype JKS \
  -keystore saml2sp.jks
This command will import the root / intermediate CA certificate(s) from the cacert.pem file into the keystore
generated above.
keytool -import \
  -alias saml2sp \
  -file cert.pem \
  -keypass akyepass \
  -storepass astorepass \
  -storetype JKS \
  -keystore saml2sp.jks
This command will import the signed certificate from the cert.pem file into the keystore generated above.
Finalize
The keystore file saml2sp.jks must be now placed in the configuration directory; the
relevant part of the saml2sp-logic.properties file should be:
keystore.name=saml2sp.jks
keystore.type=jks
keystore.storepass=astorepass
keystore.keypass=akyepass
sp.cert.alias=saml2sp
signature.algorithm=RSA_SHA1
The signature.algorithm configuration parameter is the signature algorithm
that is used with the key extracted from the keystore referenced in the
parameters.The value for this parameter must match one of the available values, each of which correspond to a shorthand for an associated algorithm as defined for use in the XML Signature specification. If signature.algorithm is not specified, then either RSA_SHA1, EC_SHA1 or
DSA_SHA1 is used depending on the type of key that is stored in the keystore.
|
4.6.12. Control JWT signature
As explained above, the authentication process generates, in case of success,
a unique signed JWT (JSON Web Token).
Such JWT values are signed by Apache Syncope according to the JWS
(JSON Web Signature) specification.
Hash-based Message Authentication Code
This is the default configuration, where Core and clients posses a shared secret, configured under security.properties
as the jwsKey property value.
jwsAlgorithm=HS512 (1)
jwsKey=ZW7pRixehFuNUtnY5Se47IemgMryTzazPPJ9CGX5LTCmsOJpOgHAQEuPQeV9A28f (2)| 1 | Valid values are HS256, HS384 and HS512 |
| 2 | Any alphanumeric value satisfying the length requirement can be used |
RSA Public-Key Cryptography
This configuration requires to specify a key pair: the former key value, said private, must be kept secret for internal Core usage while the latter key value, said public, is to be shared with clients.
The commands below will generate the required key pair via OpenSSL and format their values for usage with
security.properties:
$ openssl genrsa -out private_key.pem 2048
$ openssl pkcs8 -topk8 -in private_key.pem -inform pem -out jws.privateKey -outform pem -nocrypt
$ openssl rsa -pubout -in private_key.pem -out jws.publicKey
$ echo `sed '1d;$d' jws.privateKey | awk '{printf "%s", $0}'`:`sed '1d;$d' jws.publicKey | awk '{printf "%s", $0}'`jwsAlgorithm=RS512 (1)
jwsKey=MIIEvgIBADANBgkqhkiG9w0BAQEFAASCBKgwggSkAgEAAoIBAQCdXTaAPRoIAvWjm5MskNtcGakkME4HEhZ8oQ2J8XNU29ZT7Qq5TP769/O8OH5Pb56mPULswYSocycrAARPzjAKpxr+YN7w2/zo5MsBRZsASgpCxnCeYLCWtJzmzY/YYlAHdsu3jj/4wuAcYozR1xE5e2gEj0BQ6Xz7NELhceEZpbXIeKSDolLdCKrVZ1vdD0q/HdjY2qeBACqeG8yYXsj2MiAMJY6df80ZCqpHkcD9mhfzqUo5EcWCD7XzcOJQRNUKkBEObemq//tt5NHFbWnBeGeTJBcyXV7Uqqbjnd6hwBBS1d6usAagGQ4RWDHPBMk02BdEFyrZjgJXM1C1iU/9AgMBAAECggEBAJpbnaNKzCcBqCuU5ld3vARqk1QRIeijoHUdkWc29TdO8LygLr22vgI1h9qf255V0dwlCWmtJVAKrGfse05A5TT912egY+8FCt7z1gFoYnN1LP11I3DnTTB299UZ3DiXrwKzT368xRlhJm4RaSpIePfWiiC215LGhTbve48iongBXzkpzFYe1SCV1FmNl5Px6FE3C9GcTrFpe+rqVcIVrTLZ95+JDF4/YLgTRccW8V/YO+4OtqUo+vt8tckDGhrHrfwgTo53kxDQttecB4AryDg1eUe8vPMx1+yJz8VFwx0yaUa5fqEYlxPehRQiVJi0+YMosRqKtcm1mLxoGcwSyo0CgYEAynhB/FM9DnARwg/PsE/AuXVpXlxPU5F+shpYX2sF3rItTD4EWFr/glo26LT/MLw2ckNkLT11yAWdR8hAzVZ48Ly3Ur8Fi88iInLPEixunBIsPcR3dI2UoI9dswnTM+H/Z83yQ16VWGjtE3437LWSXBHEw/am9W9pArEunt3TQz8CgYEAxvgS7BAokIqASi0zBpmyogRVHGs0eC3mMWLG+t5VXJ5M1z1pV9dOuInnI29wJqBscefueOPcT6mNJngW/kHlcGGOxij+hRUnAdVltTod4CJ3Q/IyM6h/FzunEeumZyZ1BW3G5KTcpegcBquUW6impyJbnUvKV4p9rpLTEBooKcMCgYEAhB1skUWPdbhTHhpLH3UrANlIZDY/3Pv3fCgMulaPgf0p6bIeC7l1OI29fqN8UUS/Elg/KfYMwPRI6OoWvuZKDGxYAzp6V/xU/b2EuQsdMeH51GQ6vmcUMKDcN1OV6SjzC70q9CLnuMTezfVycJcaZdGCX4y27ThBgWw0S53bmOkCgYAdCHfiYF068irUKBJJBUZuo8kzk2UdoDz1ud8lHipAkIzP35MukSlYfi7vGcS4rjIE0P4YP8+XBDungGCCi2UKaAHoYnT5QGPnvZbQwgE4Am96x62RoiWhYz/2uncWmCL9Ps6F8JSN1Pe59XF5int+6eGKa1PEQF4kiiIoOFjh9wKBgG6XXGl84fBaOaTsCPu+oQcAAp1GzweSy4l1Y1L71YvbxU1bs5338vgiH5OeUA4d5w0Ei9d/bSw0PWV4aACWWGGclLhzv8ia6bEWqt0TskUiUJVzgTXWp3ojpsP/QE36Ty+uWWqckBXv6dnEXEgrLqzbA6qTAohSSFjV4FAjxBxa:MIIBIjANBgkqhkiG9w0BAQEFAAOCAQ8AMIIBCgKCAQEAnV02gD0aCAL1o5uTLJDbXBmpJDBOBxIWfKENifFzVNvWU+0KuUz++vfzvDh+T2+epj1C7MGEqHMnKwAET84wCqca/mDe8Nv86OTLAUWbAEoKQsZwnmCwlrSc5s2P2GJQB3bLt44/+MLgHGKM0dcROXtoBI9AUOl8+zRC4XHhGaW1yHikg6JS3Qiq1Wdb3Q9Kvx3Y2NqngQAqnhvMmF7I9jIgDCWOnX/NGQqqR5HA/ZoX86lKORHFgg+183DiUETVCpARDm3pqv/7beTRxW1pwXhnkyQXMl1e1Kqm453eocAQUtXerrAGoBkOEVgxzwTJNNgXRBcq2Y4CVzNQtYlP/QIDAQAB (2)| 1 | Valid values are RS256, RS384 and RS512 |
| 2 | Value is obtained by the commands above; the public key value is the string after the : sign, e.g. |
QB3bLt44/+MLgHGKM0dcROXtoBI9AUOl8+zRC4XHhGaW1yHikg6JS3Qiq1Wdb3Q9Kvx3Y2NqngQAqnhvMmF7I9jIgDCWOnX/NGQqqR5HA/ZoX86lKORHFgg+183DiUETVCpARDm3pqv/7beTRxW1pwXhnkyQXMl1e1Kqm453eocAQUtXerrAGoBkOEVgxzwTJNNgXRBcq2Y4CVzNQtYlP/QIDAQAB| Longer RSA keys offer stronger protection against cracking. The JWS specification suggests at least 2048 bits. Please consider that higher CPU usage is involved with longer keys. |
4.6.13. Configuration Parameters
Most run-time configuration options are available as parameters and can be tuned either via the admin console, CLI or barely invoking the REST layer through curl:
-
password.cipher.algorithm- which cipher algorithm shall be used for encrypting password values; supported algorithms includeSHA-1,SHA-256,SHA-512,AES,S-MD5,S-SHA-1,S-SHA-256,S-SHA-512andBCRYPT; salting options are available in thesecurity.propertiesfile;The value of the secretKeyproperty in thesecurity.propertiesfile is used for AES-based encryption / decryption. Besides password values, this is also used whenever reversible encryption is needed, throughout the whole system.
When thesecretKeyvalue has length less than 16, it is right-padded by random characters during startup, to reach such mininum value.
It is strongly recommended to provide a value long at least 16 characters, in order to avoid unexpected behaviors at runtime, expecially with high-availability. -
jwt.lifetime.minutes- validity of JSON Web Token values used for authentication (in minutes); -
notificationjob.cronExpression- cron expression describing how frequently the pending notification tasks are processed: empty means disabled;Restarting the Java EE container is required when changing value for this parameter. -
notification.maxRetries- how many times the delivery of a given notification should be attempted before giving up;Restarting the Java EE container is required when changing value for this parameter. -
token.length- the length of the random tokens that can be generated as part of various workflow processes, including password reset; -
token.expireTime- the time after which the generated random tokens expire; -
selfRegistration.allowed- whether self-registration (typically via the enduser application) is allowed; -
passwordReset.allowed- whether the password reset feature (typically via the enduser application) is allowed; -
passwordReset.securityQuestion- whether the password reset feature involves security questions; -
authentication.attributes- the list of attributes whose values can be passed as login name for authentication, defaults tousername; please note that the related plain schemas must impose the unique constraint, for this mechanism to work properly; -
authentication.statuses- the list of workflow statuses for which users are allowed to authenticate;Suspended Users are anyway not allowed to authenticate. -
log.lastlogindate- whether the system updates thelastLoginDatefield of users upon authentication; -
return.password.value- whether the hashed password value and the hashed security answer (if any) value shall be returned when reading users; -
connector.test.timeout- timeout (in seconds) to check connector connection in Admin Console;0to skip any check;
|
This parameter is useful to avoid waiting for the default connector timeout, by setting a shorter value; or to completely disable connector connection testing. |
-
resource.test.timeout- timeout (in seconds) to check resource connection in Admin Console;0to skip any check;
|
This parameter is useful to avoid waiting for the default resource timeout, by setting a shorter value; or to completely disable resource connection testing. |
Besides this default set, new configuration parameters can be defined to support custom code.
4.7. Upgrade from Apache Syncope 2.0
Upgrading an existing Apache Syncope 2.0 deployment involves at least the following steps:
-
upgrade Core, Console and Enduser according to the latest release notes available
-
full backup of existing DBMS used as internal storage for Apache Syncope 2.0 Core
-
download and run the upgrade tool, which will generate the full set of SQL statements required to upgrade the internal storage to 2.1
-
once uncompressed, you will find a
libdirectory and two scripts:syncopeupgrade.shandsyncopeupgrade.bat, which will be used depending on the operating system -
copy the JDBC driver JAR file compatible with the internal storage into the
libdirectory -
run the tool as follows:
$ ./syncopeupgrade.sh org.postgresql.Driver \
 jdbc:postgresql://localhost:5432/syncope syncope syncope postgres \
 upgrade.sql
assuming that:
-
org.postgresql.Driveris the JDBC driver class name -
you have a PostgreSQL instance running on localhost, listening on its default port 5432 with a database
syncopefully accessible by usersyncopewith passwordsyncope -
SQL statements are generated onto the
upgrade.sqlfile
-
-
-
shutdown the Java EE container running Apache Syncope 2.0 Core
-
execute the SQL statements as generated above against the internal storage: in case of errors, apply manual corrections until everything runs clear; consider to restore from the backup taken above if needed, before executing the updated SQL statements again
-
after deploying Apache Syncope 2.1, start the Java EE container of Apache Syncope 2.1 Core and watch the log files to check for any error